_GOTOBOTTOM
Armor/AFV: Allied - WWII
Armor and ground forces of the Allied forces during World War II.
Hosted by Darren Baker
Tamiya / ICM 1/35 Panhard AMD 35 build review
Szmann
Visit this Community
Netherlands Antilles
Joined: September 02, 2014
KitMaker: 1,977 posts
Armorama: 305 posts
Posted: Monday, February 19, 2018 - 09:45 PM UTC
Hello, guys!

I just received this kit for build review and I'm on the move:

Engine on the sprue:
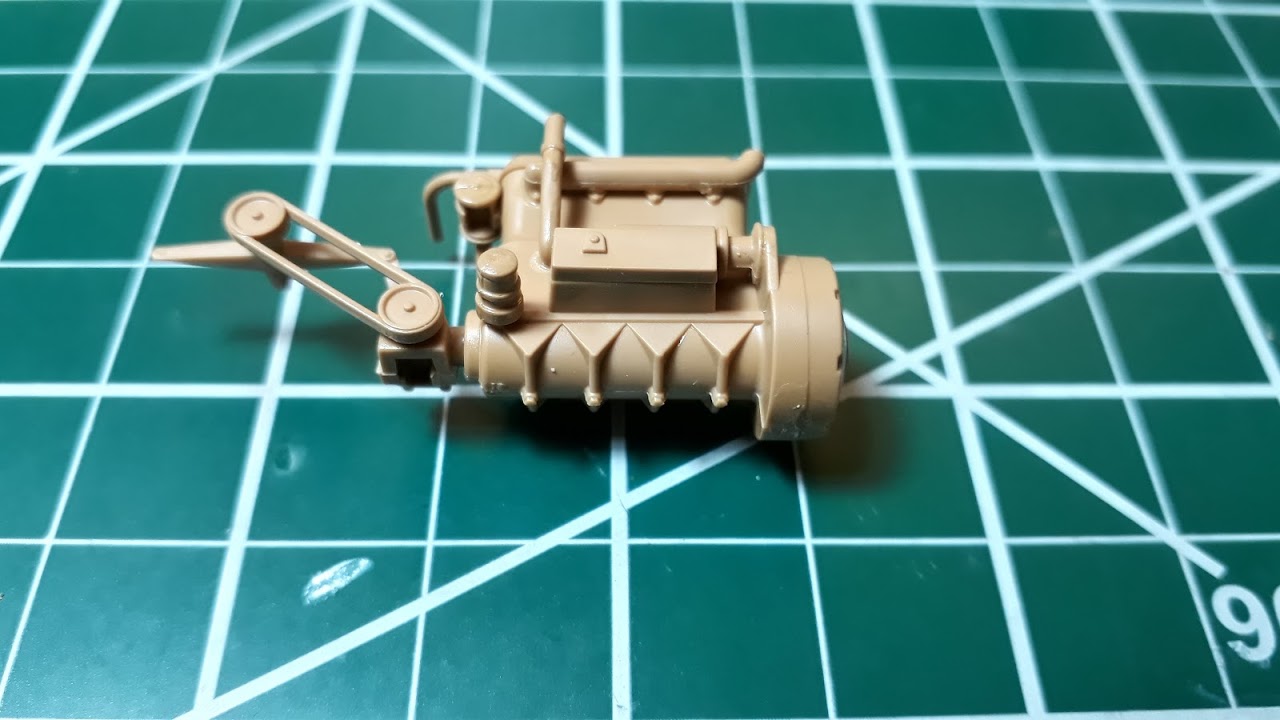

Engine assembled:


Engine primed:


Engine painted flat aluminum:


Engine detailed:


Engine after oil washes:


Eighteen birds with one stone! Mass painting of seemingly infinite ammo canisters:


Engine room primed with red oxide (?)


Cannon ammunition and driver's seat in place; interior painted with off-white (?)


Co-driver seat in place and some detailing - more to follow:


Engine dry-fitted in its place:


Thanks for watching!
Cheers!
Gabriel
Hwa-Rang
Visit this Community
Kobenhavn, Denmark
Joined: June 29, 2004
KitMaker: 6,760 posts
Armorama: 1,339 posts
Posted: Monday, February 19, 2018 - 11:20 PM UTC
That looks mighty fine my friend.
Mortifa
#464
Visit this Community
British Columbia, Canada
Joined: December 02, 2016
KitMaker: 267 posts
Armorama: 196 posts
Posted: Monday, February 19, 2018 - 11:51 PM UTC
Sorry but I am confused, is it an ICM kit or Tamiya or a rebox?
brekinapez
Visit this Community
Georgia, United States
Joined: July 26, 2013
KitMaker: 2,272 posts
Armorama: 1,860 posts
Posted: Tuesday, February 20, 2018 - 02:49 AM UTC

Quoted Text

Sorry but I am confused, is it an ICM kit or Tamiya or a rebox?


I have the ICM kit as a Revell rebox in German markings; this thing is all over the place.
Iraqiwildman
Visit this Community
Missouri, United States
Joined: November 24, 2008
KitMaker: 93 posts
Armorama: 81 posts
Posted: Tuesday, February 20, 2018 - 03:01 AM UTC

Quoted Text

Sorry but I am confused, is it an ICM kit or Tamiya or a rebox?


I just built this kit. It is a Tamiya reboxing of the ICM kit #35373 from 2015, but with a figure, French helmet, fuel cans and ammo boxes included. Also Tamiya redid the instructions into a booklet style. The decals say Tamiya on them and new too.

The only real problem I had was the rear turret door hinges did not line up with the hinges on the turret sides. I had to sand the inside of the doors down, or you can always position them open.

Szmann
Visit this Community
Netherlands Antilles
Joined: September 02, 2014
KitMaker: 1,977 posts
Armorama: 305 posts
Posted: Tuesday, February 20, 2018 - 04:41 PM UTC
Thank you, Jesper! Kind as always!

Tim is right. ICM kit in Tamiya boxing, Tamiya instructions and decals. They added a small sprue containing extra equipment and a figure stamped 2007.
Overall nice kit with minor fitting issues due warping.

More updates soon.
Cheers!
Gabriel
Szmann
Visit this Community
Netherlands Antilles
Joined: September 02, 2014
KitMaker: 1,977 posts
Armorama: 305 posts
Posted: Wednesday, February 21, 2018 - 09:59 PM UTC
Hi, guys!
UPDATE

More detail added and painted to the interior - still few bits and bobs left, but I'm getting there:


Using the wheels as test bed for my Liquitex paint mix:


Lacking better references, I stick with the art box, but apparently I strayed too much into blue - easy tweak:


More updates soon!
Cheers!
Gabriel
Szmann
Visit this Community
Netherlands Antilles
Joined: September 02, 2014
KitMaker: 1,977 posts
Armorama: 305 posts
Posted: Friday, February 23, 2018 - 12:18 AM UTC
Hi, guys!

UPDATE - small one.

I re-mixed the green to lesser bluish tone. Here's the difference:


Thanks for following!

More consistent updates after the week-end.
Cheers!
Gabriel
j76lr
Visit this Community
New Jersey, United States
Joined: September 22, 2006
KitMaker: 1,081 posts
Armorama: 1,066 posts
Posted: Friday, February 23, 2018 - 12:31 AM UTC
why so many dam reboxes !!! make something new !!
27-1025
Visit this Community
North Carolina, United States
Joined: September 16, 2004
KitMaker: 1,281 posts
Armorama: 1,222 posts
Posted: Friday, February 23, 2018 - 12:49 AM UTC
Nice clean build. Glad Tamiya is giving us a second look at what appears to be a nice kit.
Szmann
Visit this Community
Netherlands Antilles
Joined: September 02, 2014
KitMaker: 1,977 posts
Armorama: 305 posts
Posted: Monday, February 26, 2018 - 01:01 AM UTC
Lou, you may be right! Just checked my supplier for some interesting Japanese aircraft and all I liked it was Italeri re-boxed by Tamiya. I gave up.

Chris, the kit is a little gem indeed. If it would had no warping, it would be as close to perfection as it can be.

UPDATE

I ended up painting all parts inside (outside follows):


Body ready for assembly:


Some force needed to address the above-mentioned warping on the bow plate:


Otherwise, the fit is excellent (note the flawless bottom join line):


Wheels dry-fitted - beautiful stance:


Exhaust system installed:


Engine room hatches secured with white glue before priming:


Same with the doors:


Stowage rack extended:

... because I intend to use Tamiya's extras:


I moved to the turret, although I still have a few parts from the drive gear on the sprue:


More updates soon.

Cheers!
Gabriel
Szmann
Visit this Community
Netherlands Antilles
Joined: September 02, 2014
KitMaker: 1,977 posts
Armorama: 305 posts
Posted: Tuesday, February 27, 2018 - 12:39 AM UTC
Hi, guys!
UPDATE

I think the 25mm cannon and the MG are by far the less spectacular parts of this kit. You have seen the cannon on the last posting. Now the MG. instead of the barrel, ICM molded a little "pin". Not too pretty. Because too small to drill it out, I stretched some plastic tube and used it as a "sleeve" over ICM's "pin". To me, looks better.


More updates soon.

Cheers!
Gabriel
Szmann
Visit this Community
Netherlands Antilles
Joined: September 02, 2014
KitMaker: 1,977 posts
Armorama: 305 posts
Posted: Wednesday, February 28, 2018 - 10:47 PM UTC
Hello, guys!

UPDATE

Gentlemen, this is the only instance I has to use any sort of filler on this build. Impressive, given the complexity of the assembly.


External stowage in different stages of assembly / painting:


Turret assembled and gun / MG primed / base coated with gloss black.


Technically, the construction is complete and I am ready for priming, after some masking. I'm going to use the same red oxide enamel for priming the entire model.

Note: All hatches and doors are glued with white glue, because I didn't decide yet which is going to be how. My original intention was to make everything buttoned up. I'm still pondering.

Cheers!
Gabriel
Szmann
Visit this Community
Netherlands Antilles
Joined: September 02, 2014
KitMaker: 1,977 posts
Armorama: 305 posts
Posted: Thursday, March 01, 2018 - 09:42 PM UTC
Hi, guys!

UPDATE

The model primed with "hull red". Small other sub-assemblies ready for detailing:


I have a few small imperfections to deal with and I'm moving to the final painting / detailing.

More updates after the week-end!

Cheers!
Gabriel
Szmann
Visit this Community
Netherlands Antilles
Joined: September 02, 2014
KitMaker: 1,977 posts
Armorama: 305 posts
Posted: Monday, March 05, 2018 - 12:46 AM UTC
Hi, guys!

UPDATE

I primed the whole exterior with "primer red". I ignored the protest from my airbrush and kept spraying, although I've got some splatters which I had to clean afterwards (entirely my fault, of course!)


Sprayed and post-shaded the sub-assemblies:


Post-shading close-up:


Turret post-shading close-up:


Brush-painted the transmission / suspension bits:


Dry-fitting:


And now the sour cherry: the turret it's much darker than the body while supposed to be the opposite. Besides, I have some glue marks from closing all the doors and hatches; because of the warping, the turret walls needed some support on the back side and I could achieve that only by shutting the doors. I need now to re-paint the whole turret or maybe just the highlights, after I clean the washes. Otherwise, I have to say I'm quite happy with the way the paint job looks (except for tonal discrepancy):


More updates soon!

Cheers!
Gabriel
GTDeath13
Visit this Community
Attica, Greece / Ελλάδα
Joined: June 12, 2015
KitMaker: 921 posts
Armorama: 919 posts
Posted: Monday, March 05, 2018 - 01:24 AM UTC
Looking great!! Why did you prime with red? Did you use any kind of chippping medium so as to show the red primer later, duting the weathering proccess?
Szmann
Visit this Community
Netherlands Antilles
Joined: September 02, 2014
KitMaker: 1,977 posts
Armorama: 305 posts
Posted: Tuesday, March 06, 2018 - 02:03 AM UTC
Thank you, Nikos!

I haven't applied any chipping medium. The main reason why I sprayed dark red was that the green I have mixed for base color looked too much into the blue tone and I wanted to achieve an optical chromatic mix. On the other hand, I used red primer as an "in house" experiment -I didn't draw the conclusions yet. And finally, if minor scratches and chips occur during further handling, I can use them in my advantage later, as starting points for "rust runs" or silver shine-thru.

Thank you for your feed-back!

Cheers!
Gabriel
Szmann
Visit this Community
Netherlands Antilles
Joined: September 02, 2014
KitMaker: 1,977 posts
Armorama: 305 posts
Posted: Friday, March 09, 2018 - 01:06 AM UTC
Hi, guys!

UPDATE

I decided eventually to re-paint entirely the turret:
I masked first the main gun and turret interior:


Base color re-applied, followed by highlights and post-shadows in more restrained manner than the first time:


Ready to move next to clear coating and decaling.

More updates soon!

Cheers!
Gabriel
Szmann
Visit this Community
Netherlands Antilles
Joined: September 02, 2014
KitMaker: 1,977 posts
Armorama: 305 posts
Posted: Monday, March 12, 2018 - 01:26 AM UTC
Hi, guys!

UPDATE

Clear coat applied:


Decals followed:


Decals are typical Tamiya: easy to work with, the clear film reasonably clear but they are too thick and the margins visible.

I applied a first thin coat of satin, but the result is still too shiny and needs another one:


Thanks for following!
More updates soon!

Cheers!
Gabriel
Szmann
Visit this Community
Netherlands Antilles
Joined: September 02, 2014
KitMaker: 1,977 posts
Armorama: 305 posts
Posted: Thursday, March 15, 2018 - 02:22 AM UTC
Hi, guys!

UPDATE

I applied some light streaking with oil paints over the entire model; once the oils dry, I'll be ready for pigments:


Thanks for following!
Gabriel
Bodeen
#026
Visit this Community
Pennsylvania, United States
Joined: June 08, 2002
KitMaker: 1,744 posts
Armorama: 1,359 posts
Posted: Thursday, March 15, 2018 - 03:50 AM UTC
I really like this! I'm working on the ICM kit right now. I wanted to get an aftermarket barrel but it seems that MR Modellbau is the only one that makes one and it is kind of pricey for us here in the US. It's also a shame that most of that wonderful interior painting won't be seen. Awesome work. By the way...what colors did you finally end up using for the exterior? Thanks.
Szmann
Visit this Community
Netherlands Antilles
Joined: September 02, 2014
KitMaker: 1,977 posts
Armorama: 305 posts
Posted: Saturday, March 17, 2018 - 01:30 AM UTC
Hi, Jeff! Yes, the ICM kit it's a little gem and if won't be for some minor warping and four visible ejection pins will be perfect!

For painting I used my custom mix of Liquitex acrylics over enamel primer (Krylon mix).

And here is the completed model:


Thanks to everyone who followed and commented during the build.
Cheers!
Gabriel
bat-213
Visit this Community
Canada
Joined: December 30, 2011
KitMaker: 902 posts
Armorama: 788 posts
Posted: Sunday, March 18, 2018 - 04:21 AM UTC
your build is great ,love it well done .
ryally
Visit this Community
New South Wales, Australia
Joined: July 29, 2005
KitMaker: 879 posts
Armorama: 330 posts
Posted: Sunday, March 18, 2018 - 04:28 AM UTC
Nice buildup and paint, I thought you were going to do an AM barrel at the start.
Are there any AM guns for this kit out yet??
I think I will do mine in German Camo
Szmann
Visit this Community
Netherlands Antilles
Joined: September 02, 2014
KitMaker: 1,977 posts
Armorama: 305 posts
Posted: Monday, March 19, 2018 - 11:43 PM UTC
Roy, thank you very much, sir!

Peter, thank you. No, I didn't intend to use an AM barrel because this was a "what's in the box" build review on a sample sent by Tamiya America. I think somebody mentioned already an AM barrel though and also that it is a little expensive. Honestly, I would appreciate much more if Tamiya would add a lathe turned barrel to the kit than the old (2007) crates and barrels. Panzergrau camo was also my first choice, but I ditch it for reasons I will explain more in detail in the following review.

Thanks for watching, guys!

Cheers!
Gabriel
 _GOTOTOP