Chevy Semi Conversion from Barkingdigger
North Carolina, United States
Joined: April 29, 2014
KitMaker: 1,112 posts
Armorama: 886 posts
Posted: Monday, September 28, 2020 - 08:47 AM UTC
Dang it Bobby! I was on the their webpage but I cannot find it. Thanks, however Michael was able to hook me up.

#521
Kentucky, United States
Joined: April 13, 2011
KitMaker: 9,465 posts
Armorama: 8,695 posts
Posted: Monday, September 28, 2020 - 03:39 PM UTC
Wanted to reconfirm a reference on the wheelbase for the G7113.
This scan comes from Hogg's book "The WWII Standard Ordinance Catalog - of the American Arsenal"
Wheelbase: 145 inches - Overall length: (frame Length) 206 inches.

#521
Kentucky, United States
Joined: April 13, 2011
KitMaker: 9,465 posts
Armorama: 8,695 posts
Posted: Monday, September 28, 2020 - 10:34 PM UTC
I am taking a slightly different tact on construction of my G7113 than recommended by barkingdigger.
I built the forward portion of the vehicle frame first just as Tom recommends but then I went ahead and installed the forward axle and the front bumper. This gives me the two serious landmarks I needed for locating both the rear axle (at 145") and the cut of the rear frame. (at 206")
I will also forego the drilling of mounting holes for the rear spring shackles. Rather I have built up the rear axle and springs as a separate assembly, removing entirely the shackle locating pins from the 3D print. After cleaning up the frame as instructed, the rear axle/spring assembly will then slide fore and aft on the frame. I will then use my scale rule to locate the placement of the rear axle and when in place, will secure the entire assembly with super glue.
At this point I have already cut the frame but intentionally cut it a couple of scale inches too long just to be on the safe side.

Rear axle is dry fit only right now.
barkingdigger
 Associate Editor
#013
England - East Anglia, United Kingdom
Joined: June 20, 2008
KitMaker: 3,981 posts
Armorama: 3,403 posts
Posted: Monday, September 28, 2020 - 10:52 PM UTC
That's just as good an approach! By the way, that web shop link also has those gnarly early "directional chevron" pattern wheels for anyone wanting to build a replica of that catalog pic.
"Glue, or Glue Not - there is no Dry-Fit" - Yoda (original script from Return of the Jedi...)
#521
Kentucky, United States
Joined: April 13, 2011
KitMaker: 9,465 posts
Armorama: 8,695 posts
Posted: Monday, September 28, 2020 - 11:31 PM UTC
Never did find the gnarly chevron tires but did notice a number of other things my wallet did not want me to see!
barkingdigger
Associate Editor #013
England - East Anglia, United Kingdom
Joined: June 20, 2008
KitMaker: 3,981 posts
Armorama: 3,403 posts
Posted: Tuesday, September 29, 2020 - 01:17 AM UTC
Quoted Text
Never did find the gnarly chevron tires but did notice a number of other things my wallet did not want me to see!
Well, just to hurt your wallet some more, those wheels are here:
https://www.1-35models.com/home/GMC-early-patern-tire-wheels-set-p192416958"Glue, or Glue Not - there is no Dry-Fit" - Yoda (original script from Return of the Jedi...)
North Carolina, United States
Joined: April 29, 2014
KitMaker: 1,112 posts
Armorama: 886 posts
Posted: Tuesday, September 29, 2020 - 01:50 AM UTC
barkingdigger
Associate Editor #013
England - East Anglia, United Kingdom
Joined: June 20, 2008
KitMaker: 3,981 posts
Armorama: 3,403 posts
Posted: Tuesday, September 29, 2020 - 07:08 AM UTC
Hi Mike,
You wanted to see those trailer parts!
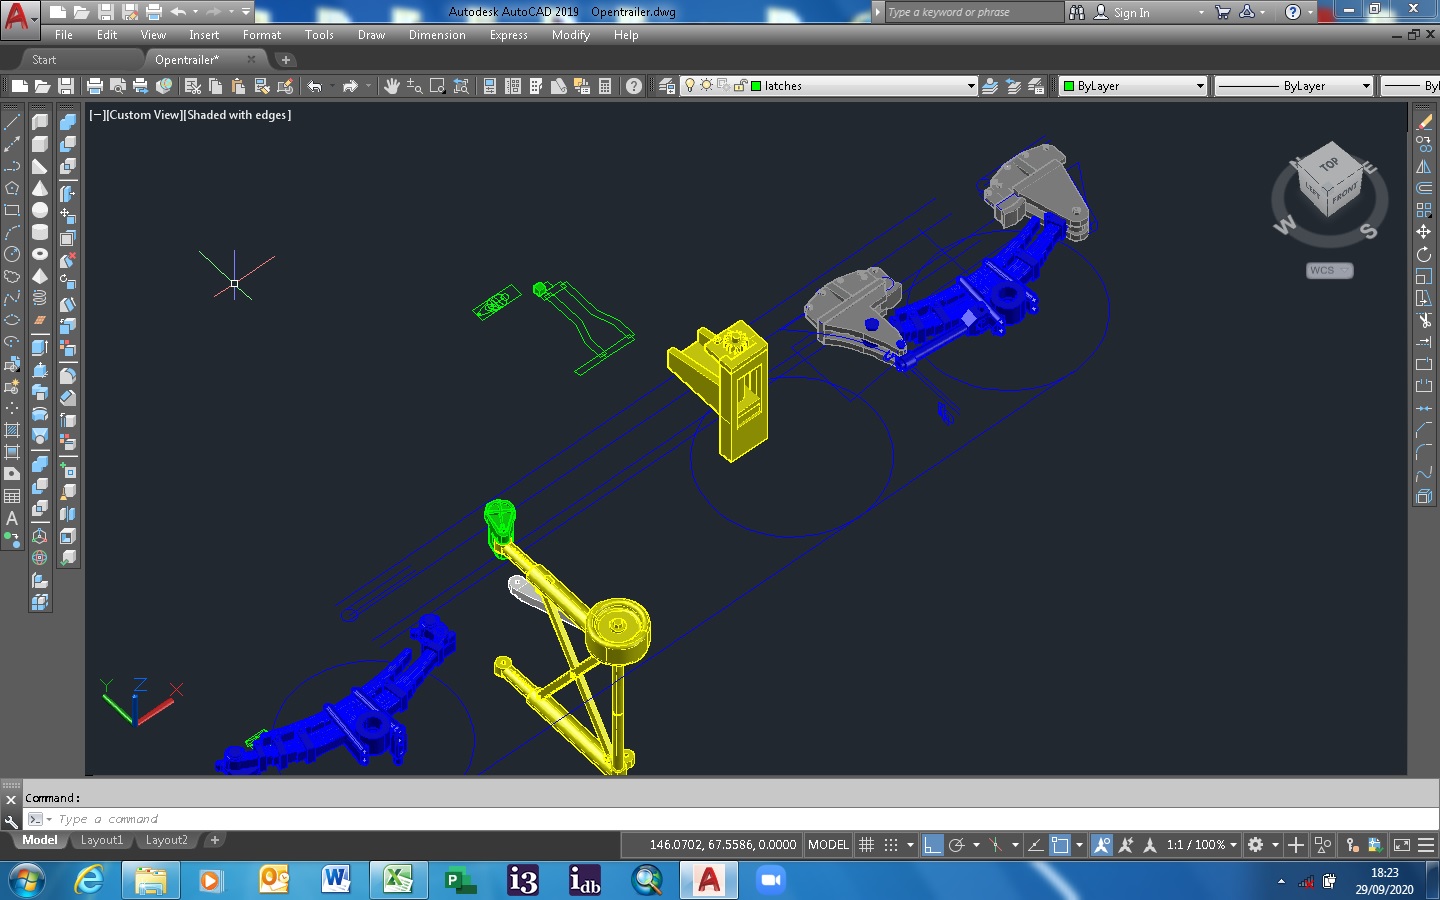
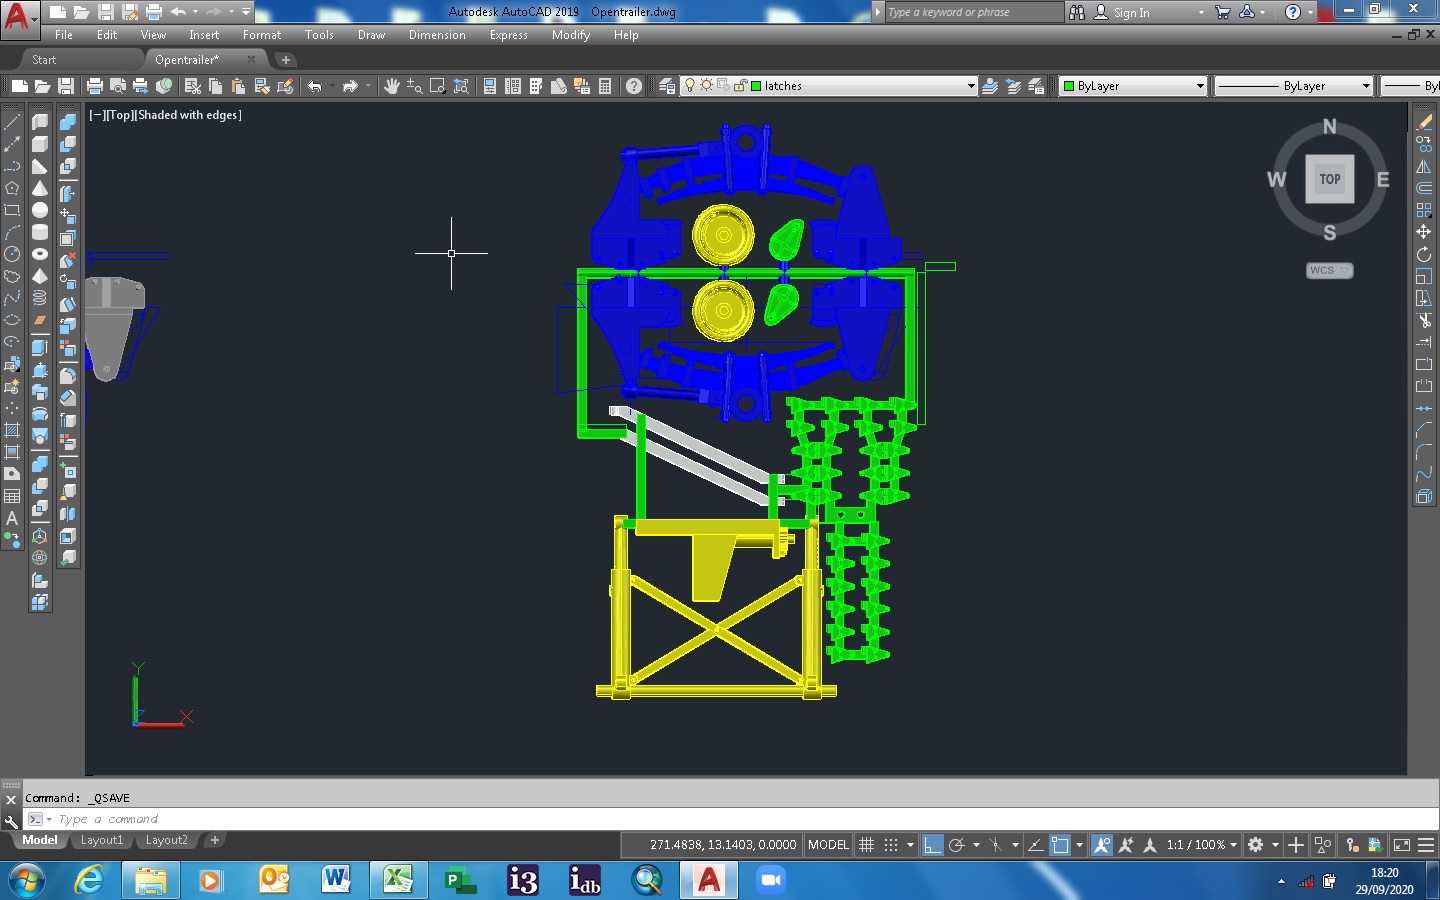
The springs are blue, the yellow is the spare-wheel holder and the landing gear, and the green is those latches on the top corners of the removable stake panels. The rest I'll scratch from Evergreen.
"Glue, or Glue Not - there is no Dry-Fit" - Yoda (original script from Return of the Jedi...)
barkingdigger
Associate Editor #013
England - East Anglia, United Kingdom
Joined: June 20, 2008
KitMaker: 3,981 posts
Armorama: 3,403 posts
Posted: Tuesday, September 29, 2020 - 07:09 AM UTC
"Glue, or Glue Not - there is no Dry-Fit" - Yoda (original script from Return of the Jedi...)
United Kingdom
Joined: April 02, 2012
KitMaker: 23 posts
Armorama: 21 posts
Posted: Tuesday, September 29, 2020 - 07:36 AM UTC
Tom,
Looks like lending you that kit payed off, nice work & congrat's. See you at Club night next week.
barkingdigger
Associate Editor #013
England - East Anglia, United Kingdom
Joined: June 20, 2008
KitMaker: 3,981 posts
Armorama: 3,403 posts
Posted: Tuesday, September 29, 2020 - 07:50 AM UTC
Hi Gary,
I'll put you on the list! (Haven't heard otherwise from Fairkytes so assume it's like last month...)
And yes the loan was most appreciated!
"Glue, or Glue Not - there is no Dry-Fit" - Yoda (original script from Return of the Jedi...)
#521
Kentucky, United States
Joined: April 13, 2011
KitMaker: 9,465 posts
Armorama: 8,695 posts
Posted: Tuesday, September 29, 2020 - 11:12 AM UTC
Those gnarly tires are . . . . . . . gnarly dude! Totally!
#521
Kentucky, United States
Joined: April 13, 2011
KitMaker: 9,465 posts
Armorama: 8,695 posts
Posted: Tuesday, September 29, 2020 - 11:19 AM UTC
I went down that same track but took a different branch line . . . . . .
(always thought that COE locomotive looked
just a little too weird for my taste. IMHO)
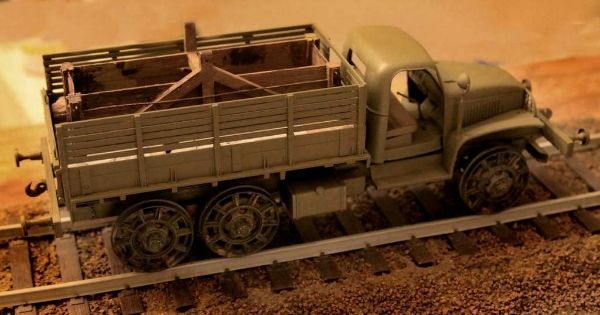
Still a work in process.
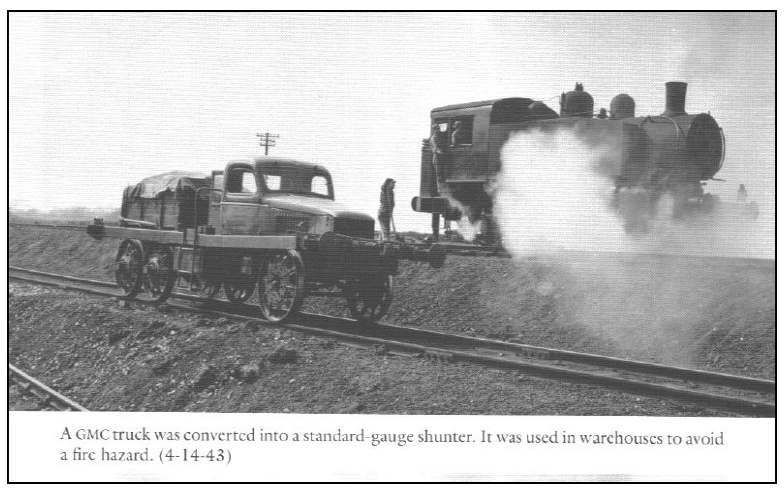
Always with a load box full of scrap metal or stone for added traction.
#521
Kentucky, United States
Joined: April 13, 2011
KitMaker: 9,465 posts
Armorama: 8,695 posts
Posted: Wednesday, September 30, 2020 - 12:48 AM UTC
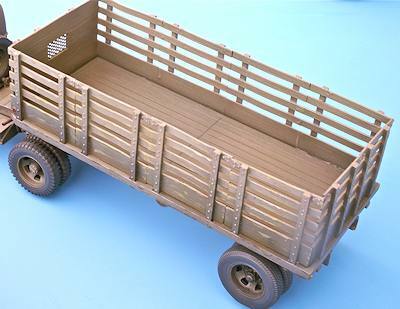
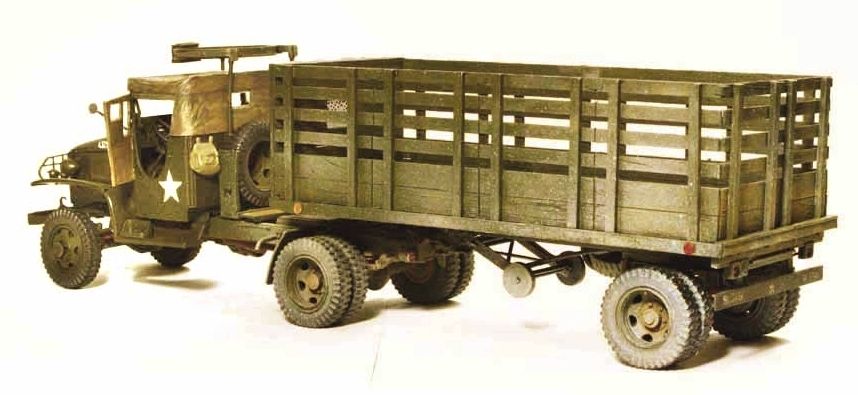
Tom - I like that you added the hardware for connecting the stake bed sections.
Consider adding the rear body beam that includes the taillights and the rear bumper. (Not sure these vehicles had a rear bumper (as it was not till the 60's & 70's with the death of some important Hollywood starlet that these anti-rununder bumpers became der rigare.)
You might want to look at the other trailers to see if there is additional hardware to add to your set. (Just to make the set even more broadly interesting.) Then there is also the more visually interesting 45 degree angled spare tire holder.
Please let us know when this trailer set will be available as I will be you first customer.
#521
Kentucky, United States
Joined: April 13, 2011
KitMaker: 9,465 posts
Armorama: 8,695 posts
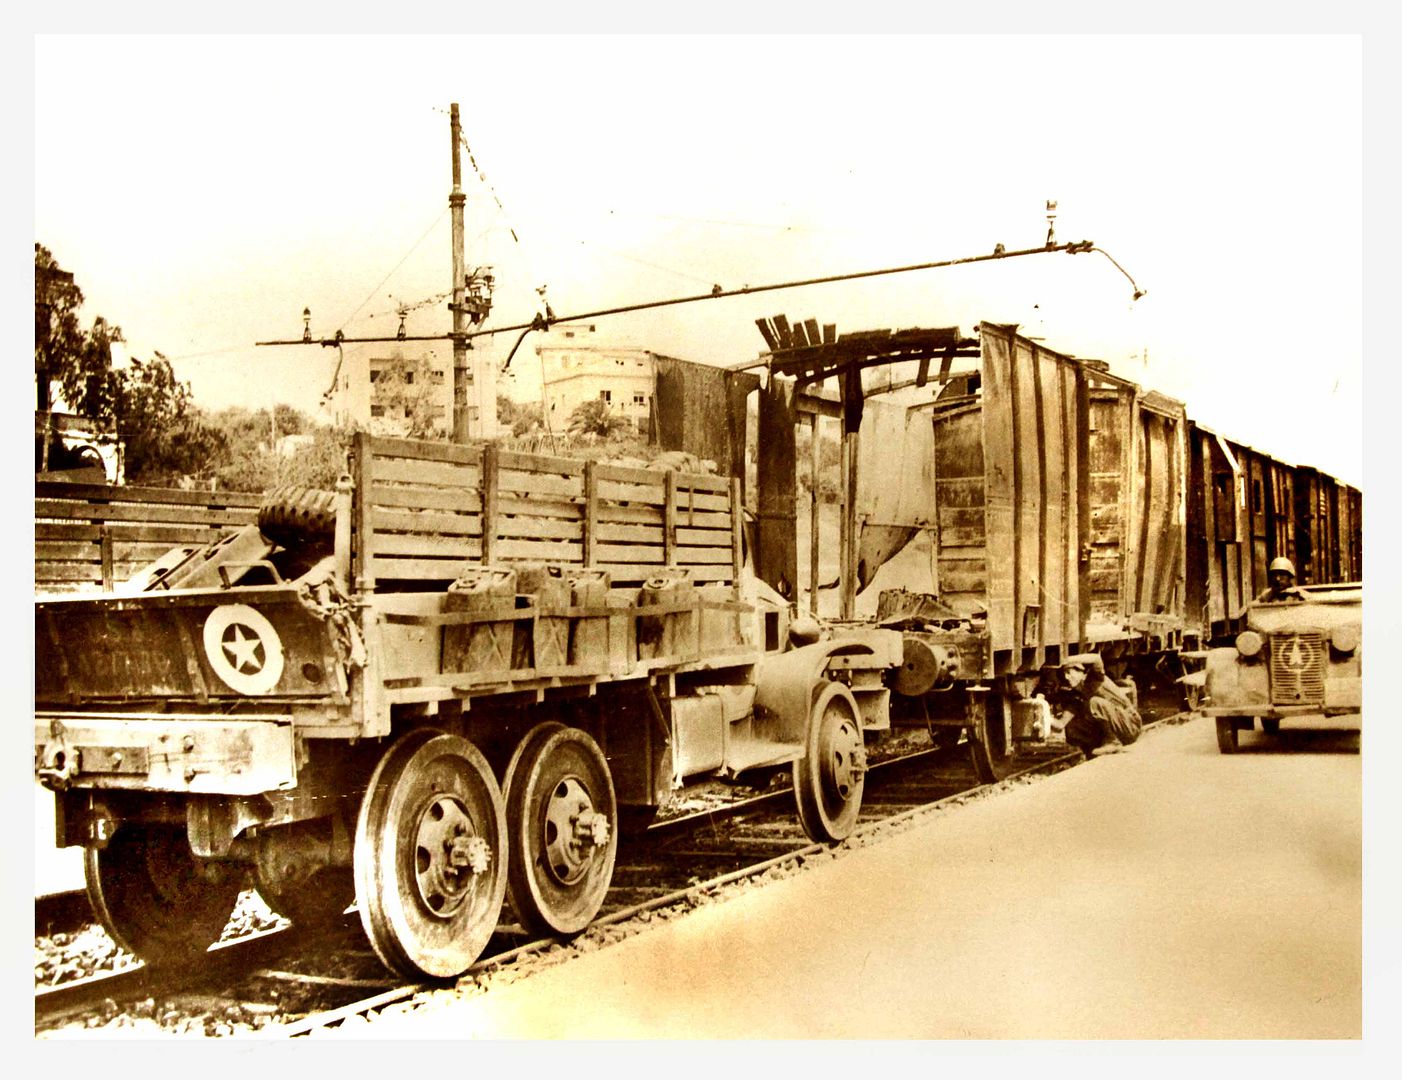
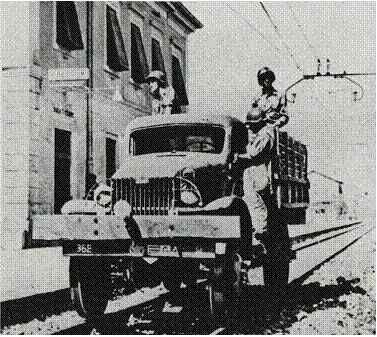
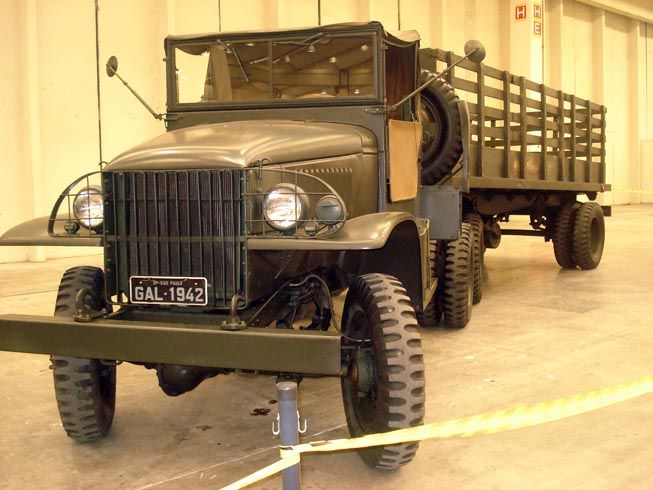
Posted: Wednesday, September 30, 2020 - 12:52 AM UTC
Field expédient conversion of a SWB Deuce into a soft cab semi-tractor.
Museum Vehicle:
#521
Kentucky, United States
Joined: April 13, 2011
KitMaker: 9,465 posts
Armorama: 8,695 posts
Posted: Wednesday, September 30, 2020 - 01:10 AM UTC
Some out there will roll their eyes and say "Oh not this again . . . but."
I recommend for those who want to make this conversion that you stick to using the Italeri water truck as you donor kit.
Some will ask why not use the newer HobbyBoss hard cab kit? The HobbyBoss cab and fenders have a serious proportional problem: The fenders and hood are too long and the cab has then been foreshortened to make up for the problem. This started with their very first offering of the open cab Deuce which mounts the Bofors AAA gun and has continued thru their entire line of CCKW offerings. The remainder of the kit is extremely well done but when building any of their versions of the CCKW I continue to substitute the Italeri hard cab for the HB.
However the HB squashed cab might be a good candidate for use in building a semi-scratch Bedford truck??? - Waste not want not! 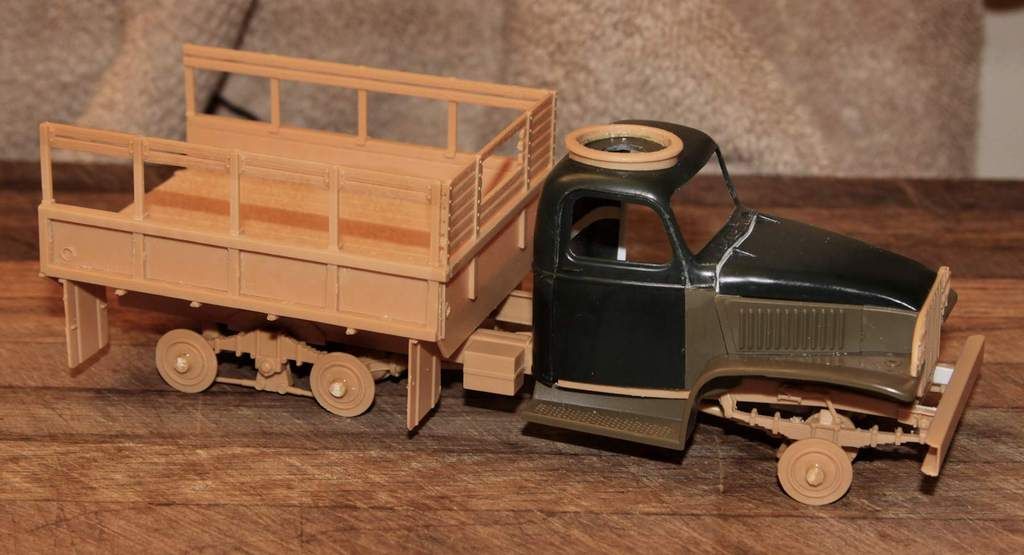
Here is one of my HB Short Wheel Base trucks under construction using the Italeri cab and Tamiya fenders - that was kind of a tough joining - I suggest you just stick to using the full Italeri cab and fender combo which is an easy drop-in conversion!
#521
Kentucky, United States
Joined: April 13, 2011
KitMaker: 9,465 posts
Armorama: 8,695 posts
Posted: Wednesday, September 30, 2020 - 03:22 AM UTC
Comparison of incorrect HobbyBoss fender (top) with Italeri fender. (bottom)
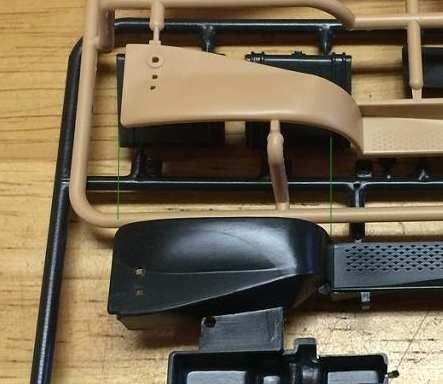 John Hale Photograph
The total overall cab/fender length is correct but the HB kit designers had to squash the cab to make it all fit.
(Bad Boys, Bad Boys . . . .)
#521
Kentucky, United States
Joined: April 13, 2011
KitMaker: 9,465 posts
Armorama: 8,695 posts
Posted: Wednesday, September 30, 2020 - 03:32 AM UTC
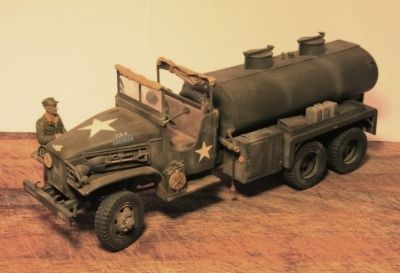
More work by John Hale: Here is the HobbyBoss fuel truck with the substituted Italeri hard cab. John also said the HB fuel cans were messed up - I suggest substituting the Asuka set.
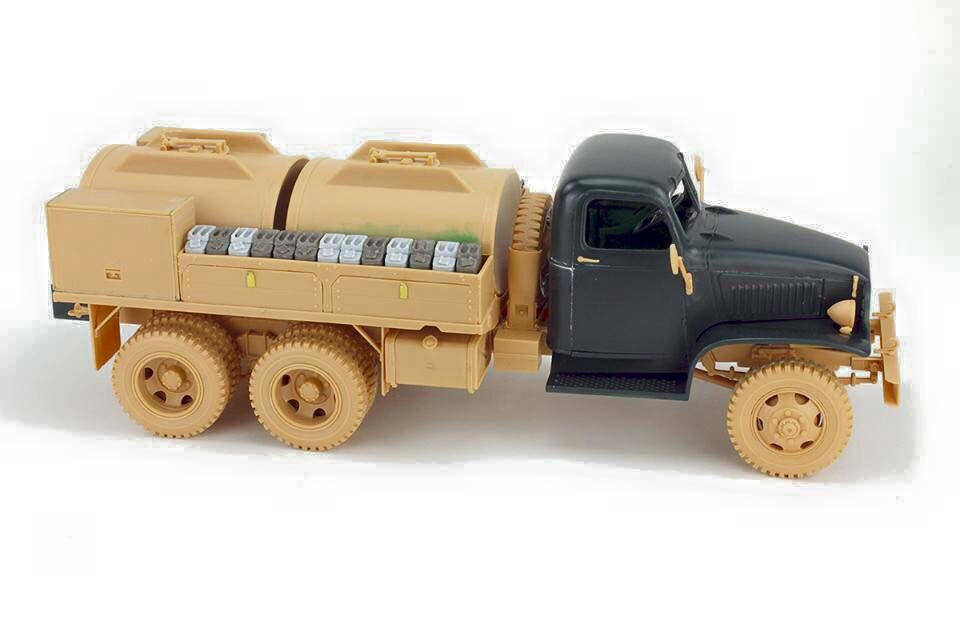
Please Note: No alterations to the HB chassis are necessary to drop on the more correct Italeri cab.
#521
Kentucky, United States
Joined: April 13, 2011
KitMaker: 9,465 posts
Armorama: 8,695 posts
Posted: Wednesday, September 30, 2020 - 03:39 AM UTC
AND . . . If you should just get tired of having all those left over Italeri water tanks and Tamiya open cabs laying around you could build an open cab water truck just to use up some of those spares! (Anybody need the Italeri water tanks parts? I got lots and I hate to see good plastic go to waste!)
#521
Kentucky, United States
Joined: April 13, 2011
KitMaker: 9,465 posts
Armorama: 8,695 posts
Posted: Thursday, October 01, 2020 - 03:08 AM UTC
Another small detail that some might find interesting while modeling the Chevy Semi, especially if modeling a Russian Lend-Lease cold weather prototype. I am told that some Chevy's and GMC's were delivered with a quilted headliner added for improved cab insulation. One maker of etched metal sets even includes this in his detail set.
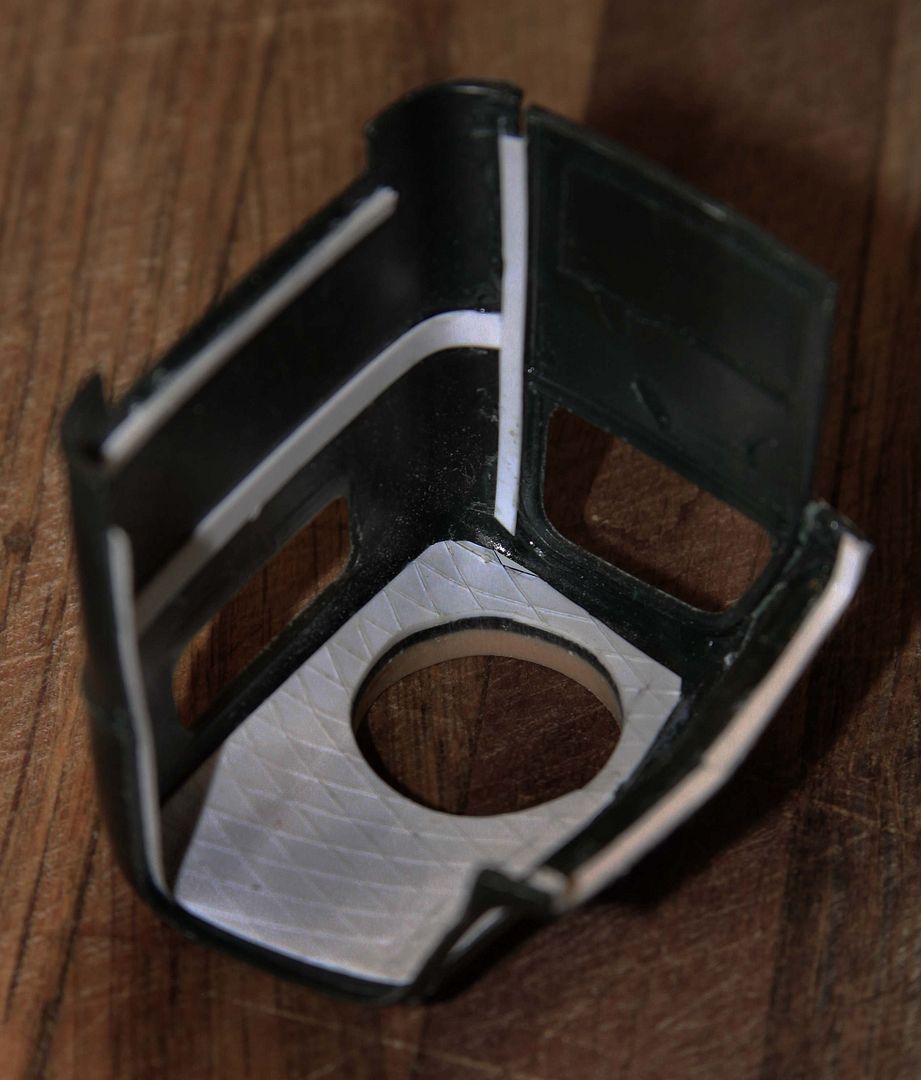
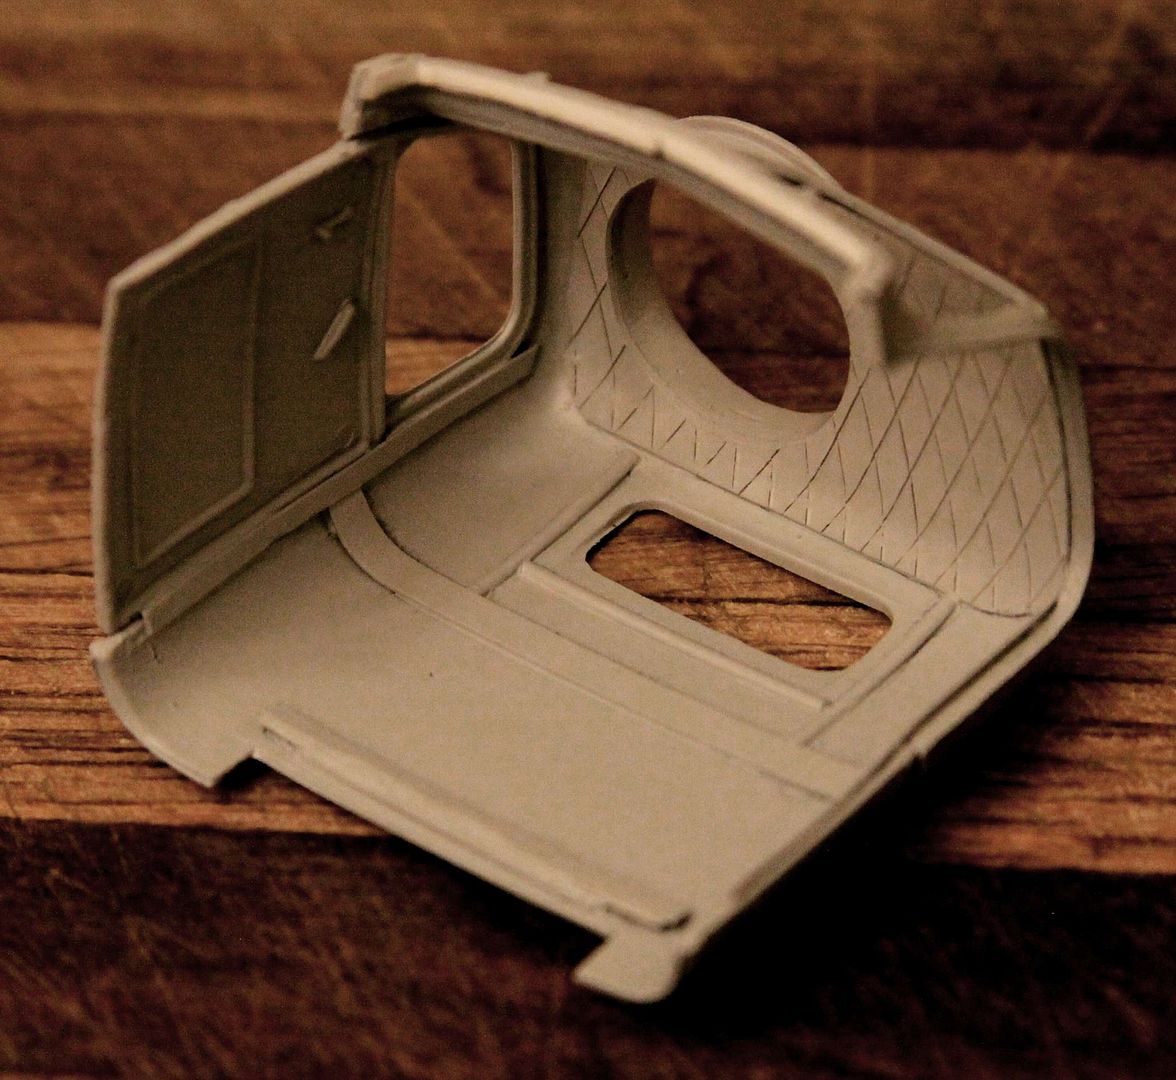
Also I always add some reenforcement channels to the inside on the cab for better detailing.
#521
Kentucky, United States
Joined: April 13, 2011
KitMaker: 9,465 posts
Armorama: 8,695 posts
Posted: Thursday, October 01, 2020 - 03:14 AM UTC
This is just my gut reaction:
On the U-Models resin offering of the 1 1/2 ton Chevy Cargo truck, to me the cab looks fine but the hood and fenders again seem too long and somehow out of proportion.
Rhone, France
Joined: December 02, 2002
KitMaker: 12,719 posts
Armorama: 12,507 posts
Posted: Thursday, October 01, 2020 - 06:08 AM UTC
Quoted Text
This is just my gut reaction:
On the U-Models resin offering of the 1 1/2 ton Chevy Cargo truck, to me the cab looks fine but the hood and fenders again seem too long and somehow out of proportion.
+ 1

H.P.
"Find the Bastards, then Pile On"
Col. George W.Patton III 's standing order for the troopers of the 11th Armoured Cavalry Regiment
barkingdigger
Associate Editor #013
England - East Anglia, United Kingdom
Joined: June 20, 2008
KitMaker: 3,981 posts
Armorama: 3,403 posts
Posted: Thursday, October 01, 2020 - 06:54 AM UTC
Quoted Text
Quoted Text
This is just my gut reaction:
On the U-Models resin offering of the 1 1/2 ton Chevy Cargo truck, to me the cab looks fine but the hood and fenders again seem too long and somehow out of proportion.
+ 1
H.P.
I haven't seen the U-Models kit in the flesh, so can't really say much about it. Am I right in thinking the Masters Production, U-Models, and CMK kits are all the same moulds just passing from company to company?
"Glue, or Glue Not - there is no Dry-Fit" - Yoda (original script from Return of the Jedi...)
Rhone, France
Joined: December 02, 2002
KitMaker: 12,719 posts
Armorama: 12,507 posts
Posted: Thursday, October 01, 2020 - 09:08 AM UTC
At least some Masters Production sets are now included in U-Models range :
https://www.scalelink.co.uk/acatalog/Masters_Productions_1_35_scale___WW2.htmlThe U-Models Chevy kit is one of them...
H.P.
"Find the Bastards, then Pile On"
Col. George W.Patton III 's standing order for the troopers of the 11th Armoured Cavalry Regiment
barkingdigger
Associate Editor #013
England - East Anglia, United Kingdom
Joined: June 20, 2008
KitMaker: 3,981 posts
Armorama: 3,403 posts
Posted: Thursday, October 01, 2020 - 10:14 AM UTC
Quoted Text
(Anybody need the Italeri water tanks parts? I got lots and I hate to see good plastic go to waste!)
I've got some too - I wonder if they are the right size and shape for one of the many fire trucks built on Chevy or GMC frames? I found and ordered a Darley pump from Shapeways for just such a conversion...
[EDIT: This is the pump:
https://www.shapeways.com/product/GTF4UAQJ5/1-35th-darley-fire-pump-front-mount?optionId=137982208&li=ostatus]"Glue, or Glue Not - there is no Dry-Fit" - Yoda (original script from Return of the Jedi...)