Bucket Bonanza 2006: The Official Thread
Region de Valparaiso, Chile
Joined: July 28, 2005
KitMaker: 1,569 posts
Armorama: 1,385 posts
Posted: Tuesday, August 29, 2006 - 05:56 PM UTC
Wow, thanks Aaron. When I was there, Iremember seeing even a Aussie Centurion, Hueys, the japanese mini sub and a bunch of other stuff, but not this one... maybe it was in disguise :-) :-)
Thanks mate
Cheers

https://www.facebook.com/klauseberlmodellbau/
Australian Capital Territory, Australia
Joined: January 10, 2005
KitMaker: 137 posts
Armorama: 53 posts
Posted: Wednesday, August 30, 2006 - 03:27 AM UTC
Hey Dex, i took a photo of the Cent too....
you want that one also? Keeping in mind this is a Bucket thread, maybe i can post them elsewere.
A.
Currently on the bench:
1/48 Tamiya Mosquito Mk IV F.B (Zerstorer! campaign)
1/48 Tamiya Bf109E-4/7
1/48 Monogram He-111
1/1 part-time PhD thesis
Region de Valparaiso, Chile
Joined: July 28, 2005
KitMaker: 1,569 posts
Armorama: 1,385 posts
Posted: Wednesday, August 30, 2006 - 05:01 AM UTC
Hi Aaron,
Don´t worry buddy, I took a bunch of pics of the Cent that time, thanks anyway......
Now back to buckets...
Cheers
https://www.facebook.com/klauseberlmodellbau/
Australian Capital Territory, Australia
Joined: January 10, 2005
KitMaker: 137 posts
Armorama: 53 posts
Posted: Wednesday, August 30, 2006 - 05:21 PM UTC
Yes - Ahhhem!!! Back to the real work horse! :-)
A.
Currently on the bench:
1/48 Tamiya Mosquito Mk IV F.B (Zerstorer! campaign)
1/48 Tamiya Bf109E-4/7
1/48 Monogram He-111
1/1 part-time PhD thesis
betheyn
 Senior Editor
#019
England - South East, United Kingdom
Joined: October 14, 2004
KitMaker: 4,560 posts
Armorama: 510 posts
Posted: Wednesday, August 30, 2006 - 05:42 PM UTC
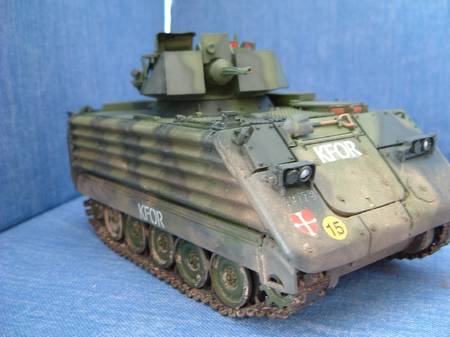
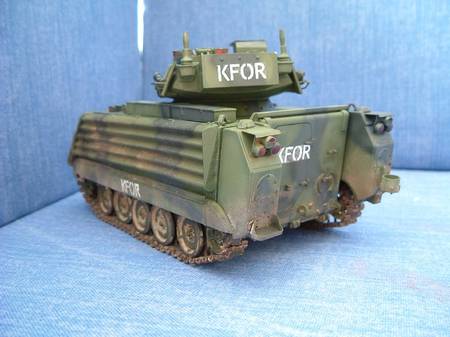
Here is my finished entry. A.F.C Clubs 1/35 A.I.F.V ( Armored Infantry fighting Vehicle).
It was built OOB and is depicted as a Turkish United Nations peacekeeping vehicle that was sent to Bosnia.
A very enjoyable build and a great learning process having never applied white paint over Olive Drab before. Tamiya paints were used with W&N oils and MIG pigments for the weathering.
We must do this again

Andy


It's not the same, better, but not the same...
Region de Valparaiso, Chile
Joined: July 28, 2005
KitMaker: 1,569 posts
Armorama: 1,385 posts
Posted: Wednesday, August 30, 2006 - 06:34 PM UTC
Great entry Andy, surely quite eye catching something painted different than green
So, until now, we have the following completed entries:
Jazza
dexter059
janwillem
tony55
betheyn
Cheers
https://www.facebook.com/klauseberlmodellbau/
Wales, United Kingdom
Joined: March 29, 2002
KitMaker: 701 posts
Armorama: 640 posts
Posted: Saturday, September 02, 2006 - 11:25 PM UTC
At long last i have finished my entry, it was beginning to feel like i would never complete this one. Anyway here is my attempt at a Danish PNMK conversion of the M-113. it is a kit bash of three kits, and the frontal add on armour is scratch built, the bolts were shaved from a Warrior kit. The parts used are as follows: Academy chassis and wheels, Accurate Armour PNMK conversion, Mr Models side armour and HKCW European track. The add on armour for the turret is scratch built and the shield over the gunners sight is made from some brass sheet.
I base coated the model in Halfords grey Primer, base coat was Tamiya Black Green.then i used Tamiya NATO Green lightened with some Buff for the main colour. Tamiya NATO Black, again lightened with some buff was then added for the camo stripes. Mig pigments were used for the weathering, both dry and wet and i used Raw Umber oil paint for the washes.,
The decals are from a sheet of generic NATO markings ,while the Danish Shield was hand painted. Not my best effort, but not bad considering i had not done any serious scratch building before, hope you all like it.

Regards from the Swamp
Eth
Region de Valparaiso, Chile
Joined: July 28, 2005
KitMaker: 1,569 posts
Armorama: 1,385 posts
Posted: Sunday, September 03, 2006 - 09:13 AM UTC
Very nice entry Ethelian, glad you finish it and thanks for participate......
Sooooo, until now, we have the following completed entries:
Jazza
dexter059
janwillem
tony55
betheyn
Hawkeye
Cheers
https://www.facebook.com/klauseberlmodellbau/
Wales, United Kingdom
Joined: March 29, 2002
KitMaker: 701 posts
Armorama: 640 posts
Posted: Sunday, September 03, 2006 - 09:01 PM UTC
Thanks Klaus, appreciate it!
Regards from the Swamp
Eth
Groningen, Netherlands
Joined: October 01, 2003
KitMaker: 1,236 posts
Armorama: 700 posts
Posted: Wednesday, September 06, 2006 - 05:05 PM UTC
Hi guys,
Her is my progres of my second entery.
It's a dutch army YPR 765 with .50 from +/- 1980.


As you can see in the last photo I have a little problem with water marks

(more like micro set marks)
I'll have to figure out how to solve this.
Jan-Willem
Texas, United States
Joined: March 09, 2006
KitMaker: 262 posts
Armorama: 219 posts
Posted: Wednesday, September 06, 2006 - 05:53 PM UTC
Here is my M113 Fitter, assembled and ready for painting. It was a fun build, and I'd do one again.
One question: what is a good color for the interior?
The comments made here are only my OPINIONS and should not be construed to be the final word on any subject. No warranties are expressed or implied. Void where prohibited. Wash with like colors only, serve immediately for best flavor.
Region de Valparaiso, Chile
Joined: July 28, 2005
KitMaker: 1,569 posts
Armorama: 1,385 posts
Posted: Wednesday, September 06, 2006 - 06:02 PM UTC
HEY! Great guys, another one building a 2nd entry (janwillem, I would like to know where did you get that kit, is it modified AFV Club or a full kit?)
Nice Build Dan, just remember it´s non US/Israeli campaign, anything else it´s valid (so, if you wanna put some aussie marks on your Fitter, it´s OK)
Cheers
https://www.facebook.com/klauseberlmodellbau/
Groningen, Netherlands
Joined: October 01, 2003
KitMaker: 1,236 posts
Armorama: 700 posts
Posted: Wednesday, September 06, 2006 - 06:23 PM UTC
It's AFC 1/35 YPR 765 PRI with 25mm cannon,
I made a new baseplate fore the m-113 style turret (academy) and added a new .50 (also Academy)
here you can see it in its "naked" state

Region de Valparaiso, Chile
Joined: July 28, 2005
KitMaker: 1,569 posts
Armorama: 1,385 posts
Posted: Wednesday, September 06, 2006 - 07:46 PM UTC
Thanks for the answer Jan, I´ll do something similar in the future and your build will help a lot, since our Army bought a bunch of those vehicles from Netherlands and Belgium.....

Cheers
https://www.facebook.com/klauseberlmodellbau/
Groningen, Netherlands
Joined: October 01, 2003
KitMaker: 1,236 posts
Armorama: 700 posts
Posted: Wednesday, September 06, 2006 - 07:59 PM UTC
if you need any tips or help on that one just aks.
I have the handbook for the soldier (it a handbook for soldiers that was given to them that changed every year) 1983 it has some photos and other info, and I did a few internet searches so I have that one coverd as well if you need it.
Jan-Willem
Region de Valparaiso, Chile
Joined: July 28, 2005
KitMaker: 1,569 posts
Armorama: 1,385 posts
Posted: Wednesday, September 06, 2006 - 09:10 PM UTC
Many thanks Jan, in time I will
Cheers
https://www.facebook.com/klauseberlmodellbau/
Texas, United States
Joined: March 09, 2006
KitMaker: 262 posts
Armorama: 219 posts
Posted: Thursday, September 07, 2006 - 12:16 AM UTC
So much for my powers of observation. The kit comes with Australian options but I very carefully went for the Israeli version.
Gee...guess I'll have to build something different, what a
darn shame...
The comments made here are only my OPINIONS and should not be construed to be the final word on any subject. No warranties are expressed or implied. Void where prohibited. Wash with like colors only, serve immediately for best flavor.
Region de Valparaiso, Chile
Joined: July 28, 2005
KitMaker: 1,569 posts
Armorama: 1,385 posts
Posted: Thursday, September 07, 2006 - 05:27 AM UTC
Quoted Text
So much for my powers of observation. The kit comes with Australian options but I very carefully went for the Israeli version.
Gee...guess I'll have to build something different, what a darn shame...
Sorry to hear about that....but I have to be inflexible in this particular rule....but I now that you can built another bucket as excellent as this one, many time still available to do it
Best Regards

https://www.facebook.com/klauseberlmodellbau/
Groningen, Netherlands
Joined: October 01, 2003
KitMaker: 1,236 posts
Armorama: 700 posts
Posted: Friday, September 08, 2006 - 05:18 PM UTC
wel my second entry is done.


I did get rid of the water marks as you can see

.
And I must now admitt that I am a Bucket-o-holic.
Jan-Willem
Region de Valparaiso, Chile
Joined: July 28, 2005
KitMaker: 1,569 posts
Armorama: 1,385 posts
Posted: Saturday, September 09, 2006 - 08:25 AM UTC
Very, very nice entry Jan Willem, cool stuff, great to see people adventuring in a 2nd entry by now.....
C´mon guys, I know there´s a lot of you around ready to show your Buckets.....
Cheers
dex bucket-o-holic too :-)
https://www.facebook.com/klauseberlmodellbau/
Texas, United States
Joined: March 05, 2003
KitMaker: 2,092 posts
Armorama: 1,607 posts
Posted: Sunday, September 10, 2006 - 02:39 AM UTC
Jan-Willem,
That's a nice looking YPR. Any issues with the build?
Paul
Groningen, Netherlands
Joined: October 01, 2003
KitMaker: 1,236 posts
Armorama: 700 posts
Posted: Sunday, September 10, 2006 - 02:51 AM UTC
just some minor fit problems with the side armor and the rear box section.
Just keep in mind that the version you get out of the box is a pre-1990 version. The new versions have some different bits.
But overal it's a nice kit
Istanbul, Turkey / Türkçe
Joined: December 16, 2004
KitMaker: 1,163 posts
Armorama: 842 posts
Posted: Wednesday, September 13, 2006 - 10:51 AM UTC
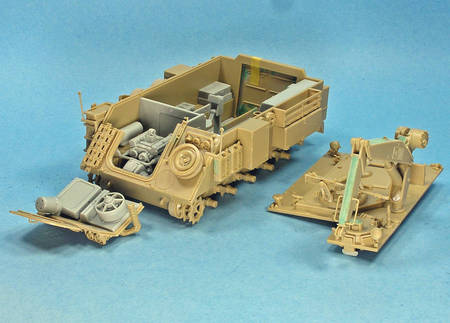
Here's the in progress shots of my Turkish bucket-to-be.
The kit is the 1/35 Italeri M-113 A1. It will depict a used vehicle that was passed over to Turkey from the States in the first few batches. As a result, the warning signs in English and other stuff are still present. After an overhaul, these were generally removed by the Turkish maintenance. The interior is pale green (After a few years of service they were all changed to interior white and the vehicles were camouflaged).
The interior before I applied the decals and weathering (I just realized that I forgot to take pics before I closed the roof- uups
)

Main mistake in the interior is the paint job on the fire extinguisher (The bottom part should be green, it was the part which holds the extinguisher in place)
Here are the construction pics during the dryfitting of the road wheels.


Proud Supporter of Armorama Campaigns
Region de Valparaiso, Chile
Joined: July 28, 2005
KitMaker: 1,569 posts
Armorama: 1,385 posts
Posted: Thursday, September 14, 2006 - 05:47 AM UTC
Cool! A turkish bucket, great entry Emre, and that one promise a lot...
Looking forward to see more updates
Cheers
https://www.facebook.com/klauseberlmodellbau/
Texas, United States
Joined: March 05, 2003
KitMaker: 2,092 posts
Armorama: 1,607 posts
Posted: Thursday, September 14, 2006 - 07:55 AM UTC
Off to a good start. If you get a chance, fix the IR light that Italeri molded upside down.
Paul


