

1⁄35Roaring Tiger

Introduction
In an effort to bring more firepower to support advancing infantry, Germany began designing a howitzer based on the already proven Tiger I E. Originally the design planned to use a 21cm howitzer but due to difficulties it was decided in August 1943 to adopt instead a short-barreled 38cm Raketenwerfer 61 L/5.4. The Raketenwerfer was a breech loading rocket launcher/mortar, with a range of 4,600 to 6,000 meters. The directive to convert battle damaged Tiger tanks into the Strumtiger was issued in April 1944 and production began.There has been some discussion as to whether the AVF kit represents an early or late Sturmtiger and centers around the characteristics of the boxed fighting compartment as opposed to the Tiger chassis it sits on. The various manufacturers performing the conversions used whatever was at their disposal, so its possible in reference photos to see a mix and match of early and late hulls from one vehicle to the next.
The kit I used is AFV Clubs new Sturmmorser Tiger #35103. The hull supplied in the kit is that of a late Tiger I. The vehicle I chose to represent is from the 1001st battery and has a late fighting compartment mounted on an early/mid Tiger hull, so some modifications were required. I also used the extensive and very detailed Voyager detail set #35136. This is a multi-media aftermarket set which includes 5 frets of PE, styrene rod, wire, a resin barrel and mantlet, and brass pistol port plugs to supplement the kit parts.
Lower Hull
Since the AFV kit hull is from their Tiger I late, it needed to be modified to represent a mid hull with the larger diameter idler wheel. I used one of the spare idler wheels left over from a DML Tiger I Late 3-in-1 build in place of the AFV items. In addition, the towing eyes were modified by adding a small piece of styrene and sanding to the correct shape.In step 3 the AFV instructions direct you to install the springs provided to give the idler arm tension however they are a bit strong for plastic tracks so I left them off. Step 5 is the assembly of the rear hull plate and for the mid-Tiger hull the access plate needs to be removed. Unfortunately, I didnt catch this detail until after assembly and zimmerit was applied but was able to remove it later on.
Before adding all the details, I encountered a problem when adding the engine deck later in step 24. The molded on ribs inside the hull rear plate get in the way of the cooling fan grills. If the ribs are left in place, they dont allow the grills to sit flush with the rear armor plate and so were removed.
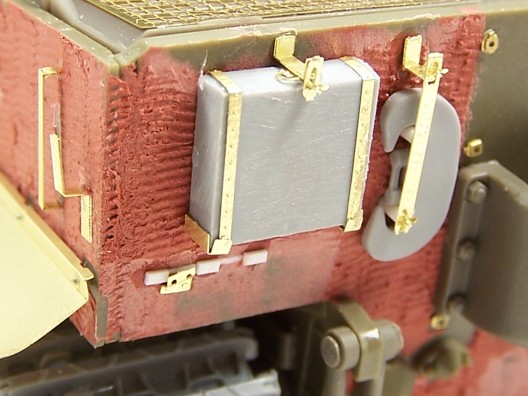
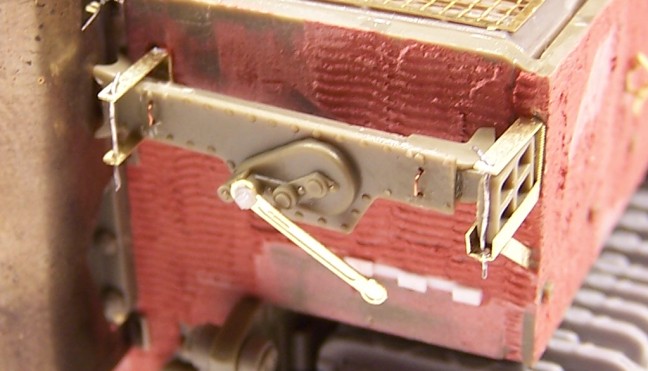
One of the nice advantages the Voyager set gives you is the choice between options for the towing clevis mounting brackets as well as the brackets for the 20-ton jack on the rear hull. I recommend that you check your references before deciding which to use.
In Step 7 it was necessary to leave off parts SB9 & SB10 until mounting the fighting compartment to the hull to insure no gaps resulted. This step also directed to attach the mud guards but since I used the Voyager items instead, I left these till later to avoid knocking them off during the remainder of the construction process.
Upper Hull/Engine deck
Step 9 deals with the engine deck support frame. This was a tricky part to remove from the sprue due to the fact that the part is very delicate and the sprue very thick. During the removal, the rear section of the frame easily broke off, requiring a replacement with styrene. This is especially necessary if the hatches will be modeled open. After assembling the engine deck, be sure to install this to the hull before adding the small details to avoid disasters. Once completed, I moved again to the Voyager set.After examining the Voyager provided grill screens, I elected to use the grill screens from the AFV kit. The Voyager set would have you cut out the sections for the coolant caps and support brackets but in doing so, there is no frame around this, as there should be. I also left off Voyager parts B10 since these were not present in the reference photos for the vehicle I was building. Voyager includes brackets for the towing cables despite the fact that these brackets were not used on the Sturmtiger and only the lower welded on part is evident. Since I was using the Voyager set, in step 6 of the AFV instructions it was necessary, for part SB3, to remove the molded on mounting bracket for the headlamp. Since my Sturmtiger shows the light cover left off, it was a nice touch that Voyager provided the option of leaving it off as the case requires.


About the Author


Comments


All Rights Reserved. Please read our Conditions of Use and Privacy Policy.