

1⁄35DML M4A2 Russian Sherman
DML M4A2 (76) W Kit Number #6188
The M4A2 (76) W
The M4A2 (76) W was produced at the Fisher and the Pressed Steel Car Company plants from May 1944 until approximately June 1945, reaching a production total of 2915 tanks. These tanks were used primarily for the Lend Lease program with the vast majority of these vehicles going to the Soviet Union. Post WW II, a number of the E8 (HVSS) tanks were sold to the Canadian government as the M4A2 had never gained much popularity. Canada used these tanks to equip their Reserve Army and help to train the regular component. They were used by some reserve units into the mid-1960s. Many can now be seen as monuments outside of many Royal Canadian Legion halls and as gate guards throughout the Country.The Kit
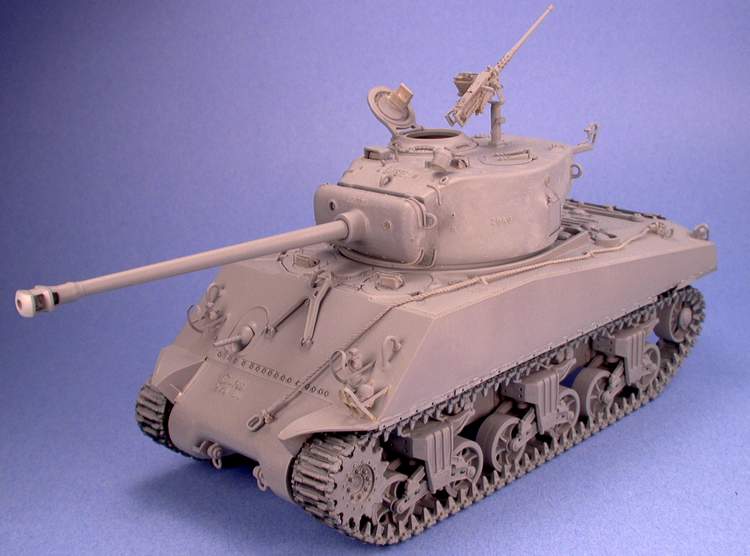
DML have continued to re-invent themselves throughout the years, and only for the better. We have seen a huge improvement in terms of quality of casting and content. Recent DML offerings have included optional parts to build multiple styles. Our spare parts boxes have never been happier or fuller. DMLs latest offering comes in my favorite color, O.D green. This review will not compare it to Academys offering as I have not built or bought it. DML has decided to give us everything we need in one box. The box is loaded to the seams with just about everything you need to build this kit out of the box. The kit is molded in DMLs standard grey plastic. Included in the kit are 307 injection plastic parts including 18 clear plastic parts for headlights, taillights, and vision blocks. An aluminum turned barrel with a plastic muzzle brake is included as well. Included are photo-etch headlight and taillight guards, periscope guards and tow cable attachment points. Another innovative feature is a wire tow cable made out of soft pliable metal. Going in the opposite direction of most Kit manufacturers DML has decided to add one piece vinyl tracks. These are some of the best-looking vinyl tracks I have ever seen and they should be well received by Shermanholics. Finally a vinyl mantlet cover is included. All of these multimedia parts are separately packaged and mounted onto a cardboard backer.The Build Lower Hull
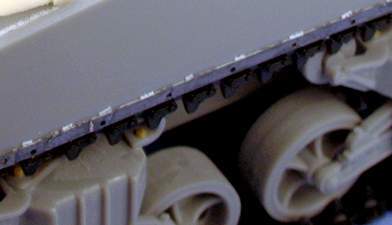
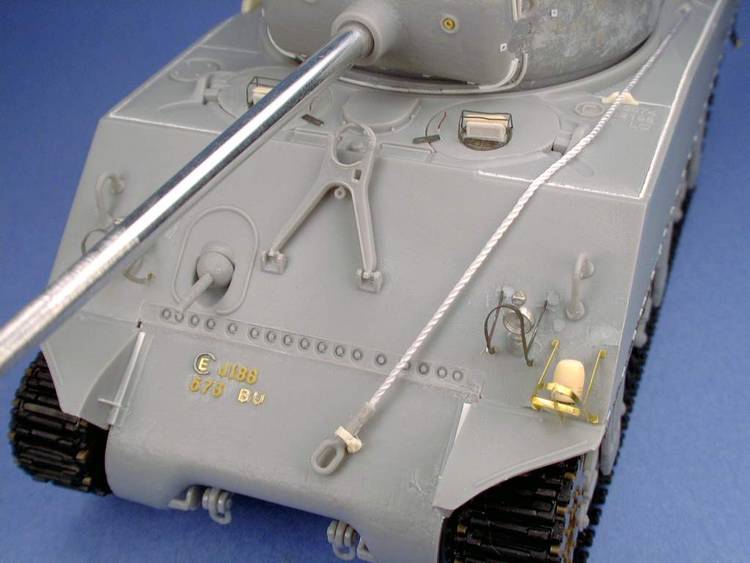
Starting from the ground up I encountered no problems working with the Lower Hull. You get the choice of either the early straight return roller arms or the upswept style. My references indicated that the upswept arms were the correct choice so I went in that direction. Four holes were drilled into the opposite face of each arm as seen on the original. Four bolts were also added to the skid plate. Of particular note here the kit includes the spoked drive sprocket and my references indicate that the closed flat design were the most common. I substituted the drive sprocket with a Tamiya item re-drilled to the proper diameter. Of special note here the instructions have missed some important points on attaching the bogie assemblies to the lower hull in Step # 3. In the most recent model kits, they have included a supplemental correction sheet that shows the missing Steps. Moving on to the final drive housing you are provided with the correct late style single-piece. The final drive needs a bit more cast texture in my opinion so I added a bit with some thinned putty. I also added casting numbers and foundry marks from plastic and photo etch sources as well as solder wire for the foundry mark. The rear plate is now attached as well. It appears to have the correct exhaust features but is missing the radiator slats normally seen. I left this as it came as I felt the overhang was sufficient to cover it. The beautiful tracks -- ohhh how I wanted to use them! They were too long by about 3 links and my attempt to shorten them resulted in failure Im afraid. They could not be glued with either regular or CA type glues. Using the staple method was not an option as they would show through, so I used a set of AFV Club T49 rubber band type tracks and they fit perfectly. Looking back I probably could have used a needle and thread to sew the shortened tracks but hindsight is 20/20.Upper Hull
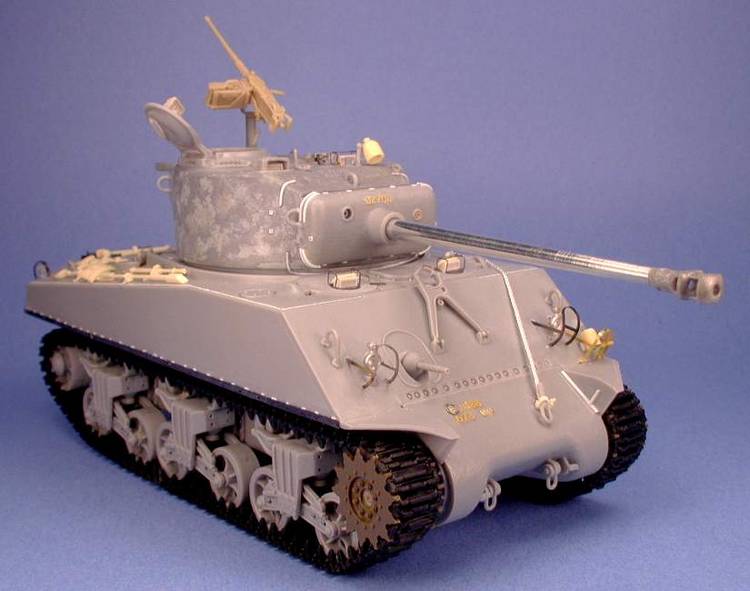
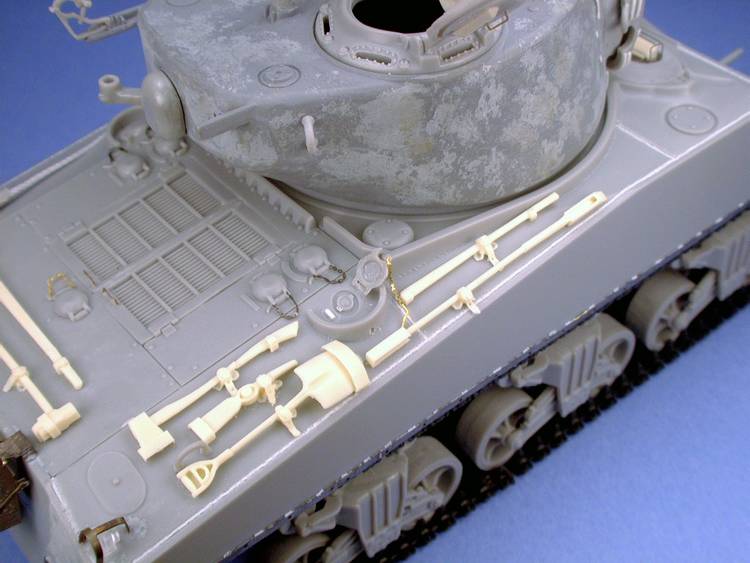
The upper hull provided in the kit has the correct 47-degree glacis and large hatches. There are some cast and foundry marks provided which is a nice touch. The hull weld beads have been molded recessed and should actually be either flush or just slightly raised. I tackled this by using styrene rod and Tamiya Extra thin cement. You can see this method by reading my short article here on Armorama. The sand shield-mounting strip comes molded to the upper hull and my ever-increasing bout with advanced modelers syndrome (AMS) forced me to remove this and add a Photo-etch replacement from Eduard. Once the PE sand strip was in place I added small spot welds all along the strip as was found on the original. Also very worthy of note are the molded fuel filler caps. You can pose the armoured covers in either the open or closed position. I decided to open one up here. All that is needed is to remove the center portion of locking point and add it back to the hull. This is the part that the locking pin passes through. I added Photo etch keeper chains from Eduard to the pins. Now for the tools, there is no nice way for me to say this but DML tools are some of the worst out there. Formations Models, fortunately for us, are here to save the day and I used their absolutely beautiful tool set. They are a bit fiddly to work with but well worth the extra effort. I also used Formations Models Tow cable and attachment points in lieu of the DML parts mainly because they are a bit easier to use and I was feeling a bit lazy. This is not to say the DML parts are not useable as they are very well done and should prove easy to add. I also replaced the plastic stowage shelf with an Eduard item. I found the DML photo-etch a wee bit too soft and it was impossible to handle. It bent and deformed if I looked at it the wrong way -- it was probably my ham fisted building technique. So I replaced the DML headlight and taillight guards with Eduard items as well. The headlights themselves were also replaced with Grief white metal items that come with a glass lens as well. These are fantastic value for the money and really add something to your kit. Missing from the kit are the spare track holders usually found on either side of the rear hull. Instead, they give you what appears to be an infantry phone box, which was only used Post-WW II as far as I know. I had originally just decided to leave them off completely but I have since added these from the Eduard M4A3 set.Turret
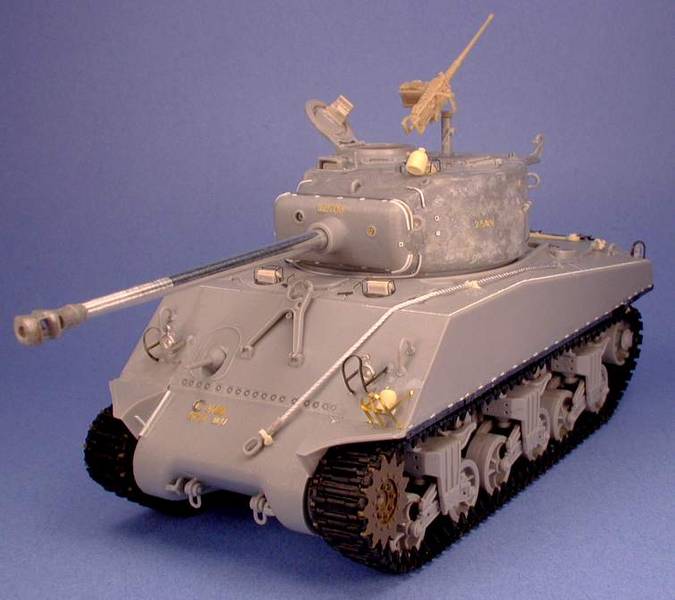
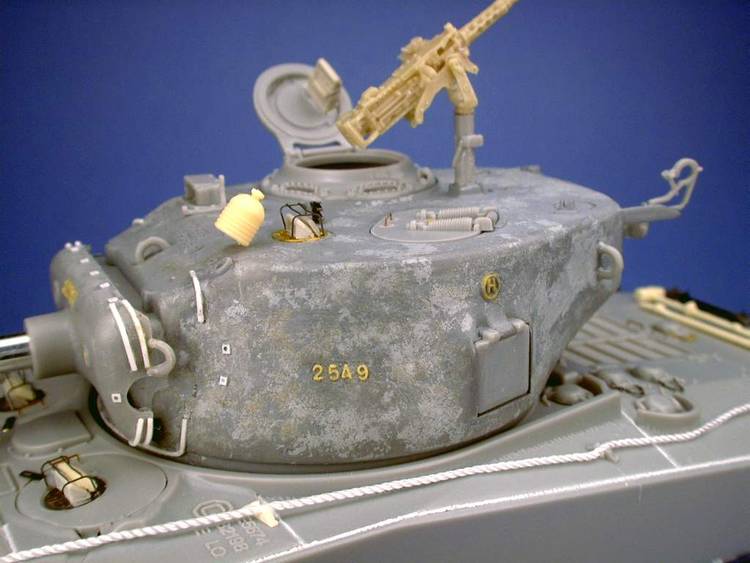
The T23 Turret is a real winner compared to their previous attempts at it. It represents the later style with the oval loaders hatch and center mounted .50 cal pedestal. They have wisely decided to lower the joint for the two halves so that the pistol port is properly cast into the turret side. You also receive a separate port door so that with a bit of cutting and scratch building you could have an open pistol port. I joined the two halves together and proceeded to putty over the joint and sand it smooth. I then thinned some Tamiya grey putty with extra thin cement and daubed it onto the entire turret for some added texture. I did this in three separate applications for a more realistic texture. Included in the kit is a great vinyl dust cover but WW II M4A2 (76) tanks from what I have been able to see did not use the mantlet dust cover. So you are forced to add the attachment points and rods. I made the mounting points from styrene strip with a hole drilled into the center. The mounting rods are simply styrene rod bent to shape and glued in place. The open periscopes are TWS items with Eduard PE brush guards. The .50 Cal is the excellent Verlinden resin offering with an Eduard PE barrel clamp. A Formations Models searchlight replaced the DML piece only because I had it left over from a previous project. Casting numbers and foundry markings were added from plastic and photoetch as on the lower hull. The barrel provided in the kit is of the turned aluminum variety. These save the builder a load of time from scraping seams and sanding down high spots. You receive a plastic muzzle brake but my example did not fit onto the metal barrel very nicely and the center baffle was molded shut. So I had to drill out the center of the muzzle brake I then sanded the base of the muzzle brake square. The barrel needed slight sanding with an emery cloth for it all to line up nicely and was finally joined together with cyanoacrylate glue.Final Thoughts
I thoroughly enjoyed building this tank. My first thought upon opening the box was that I got way more for my money than I had bargained for. This kit can be built straight out of the box with superior results. I unfortunately have a pretty advanced case of AMS so I had to add a few bits here and there. But on the whole I added less to this kit than most I build. This is without a doubt probably the best Sherman kit on the market. DML have done their homework and the market research they employed on this kit shows through. You will not be disappointed with this kit in any way. From the out of the box builder to the rivet counter you will get more than youre used to. I plan to build this kit again only next time I will be adding HVSS suspension and tracks and paint it up as a Post-War Canadian tank. I whole-heartedly encourage anyone with even the smallest desire to build a Sherman to give this little gem a shot.


About the Author


FROM: ONTARIO, CANADA
I have been modelling on and off for most of my life really. I took a rather long break while I was in the Army and re discovered the hobby when I went back to University. My main area of interest is Canadian Armour of the Second world War. I have a real love of the Sherman tank especially the Fire...
Copyright ©2021 by Bryan Gray. Images and/or videos also by copyright holder unless otherwise noted. The views and opinions expressed herein are solely the views and opinions of the authors and/or contributors to this Web site and do not necessarily represent the views and/or opinions of Armorama, KitMaker Network, or Silver Star Enterrpises. All rights reserved. Originally published on: 2005-01-22 00:00:00. Unique Reads: 11534

WEB HOSTING BY


Copyright ©2021 Armorama and Kitmaker Network, a subsidiary of Silver Star Enterprises
All Rights Reserved. Please read our Conditions of Use and Privacy Policy.
All Rights Reserved. Please read our Conditions of Use and Privacy Policy.