1⁄35
Pershing Korean Tiger!
 |
Introduction & Assembly |
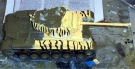
This kit has intrigued me since I saw a picture of it online. As a tanker the
thought of painting my tank with the face of a tiger, bright yellow and all, was
crazy, until I took the context into account. We had taken horrendous losses in
Korea and the end was not in sight when the Pershing M-46 tank was deployed.
With its 90 MM gun and good armor, it was more than a match for the T-34/85s
that the Chinese put up against it.
It was the year of the tiger, so they thought, "What the hell, lets scare the
hell out of the Commies!" The Pershing Tiger was the result. Though the
painting on the tank had little result, it is a classic. In my recent
researching of armor in Vietnam I have found at least one case of the painting
of a large cat or tiger face (it is hard to tell) on the front of an M48-A3.
The Dragon kit was the only one around until the Tamiya kit came out, but is a
great kit and full of good details and is finely molded. I had some problems
with the separate track links, but I got them on OK. The running gear is quite
detailed and went together without a hitch (note that I have also built the
T-26E5 Dragon kit, which helped with this). I then assembled the deck and put it
on the chassis. The fit was not perfect and I had to super-glue the hull
together at the front. The turret was next and I ended up gluing the hatches
shut as there is no interior other than the gun breach and I was building it
stand-alone without figures. I filled the seam on the turret a little and sanded
it down and you cannot even see the seam on the finished tank. The rest of the
turret went together alright except for the fit of the gun and the mantlet. It
was a little funny but I finally got it all to hold together after some
adjustments.
The kit has a lot of small details and I put them on next. There are separate
sponson cover handles and grab-rails too. The headlights are small and there are
3 pieces, which caused me all sorts of grief, since the connecting spots are
hard to find and align. The guards went on well, considering their flimsy
appearance. I missed the rear fender braces and had to add them after painting,
but they are easy to do. Be careful taking these off the srues as they are very
thin. I broke one and had to fix it.
Copyright ©2002 - Text and
Photos by Lance Mertz (2-2dragoon). All Rights Reserved. |
| Project Photos
|
 |
About the Author
About Lance Mertz (2-2dragoon)
Former Army Reserve Major. Served in the 2nd ACR 1978-80.
Copyright ©2021 by Lance K. Mertz. Images and/or videos also by copyright holder unless otherwise noted. The views and opinions expressed herein are solely the views and opinions of the authors and/or contributors to this Web site and do not necessarily represent the views and/or opinions of Armorama, KitMaker Network, or Silver Star Enterrpises. All rights reserved.


