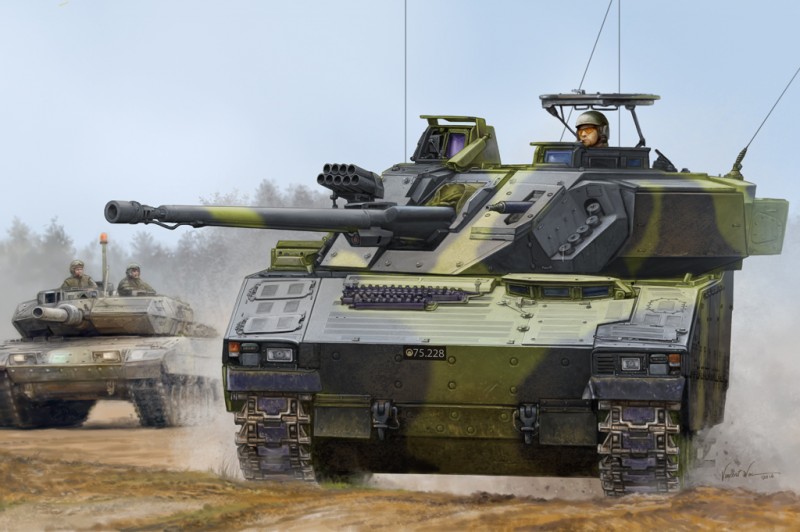
The Cv90 program started in the mid-eighties as a result of a change in the Swedish defence plan. As a result of all this the army moved towards a higher degree of mechanization of its infantry. Hâgglund & Sônner won a competition for a new vehicle and so the CV90 program started. The CV90 quickly developed into different variants and soon other nations became interested too. This lead to a development of the main gun configuration, and today it is available in a 40mm, 35mm and 30mm version.
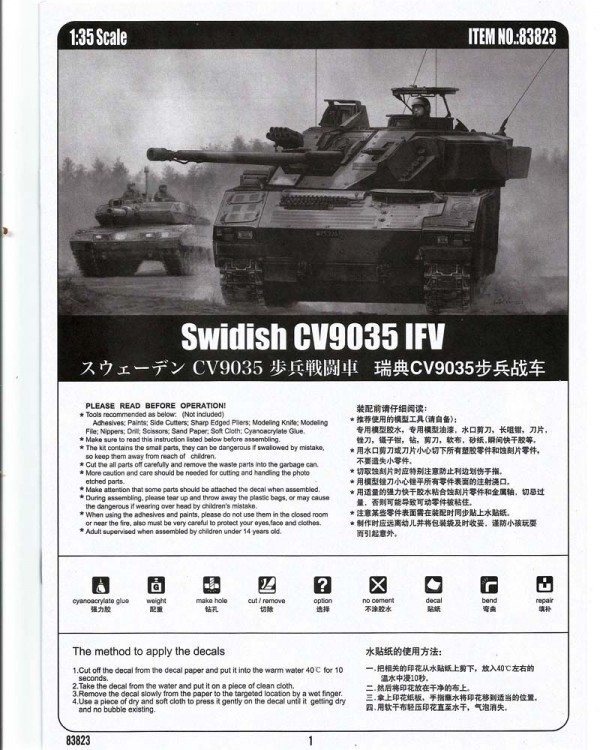
Academy was the first company to offer this vehicle in 1/35th scale. It was the standard Swedish CV9040B version. Soon after Hobby Boss introduced their version of the -40B too, and later they also offered the updated CV9040C. Later came the CV9030 version and now they offer the CV9035 version. On all of their kits they name it Swidish; not only spelled wrong but also false as at least the Cv9030 is in fact a Norwegian version and the CV9035 is a Danish version offered.
In the Danish army the Cv9035 is called IKK, Infanteri Kamp Køretøj (Infantry Fighting Vehicle). I wont go further into the history of this vehicle in the Danish army; however should one need to know more then please read my walk around feature here.
I have personally always been in love with this vehicle. I think its the most beautiful AFV around today. I think its kind of IKEA gone military. I had hoped for many years that a CV9035 would be offered and when it was finally announce at Christmas 2013 I couldnt wait to get my hands on it.
Contents
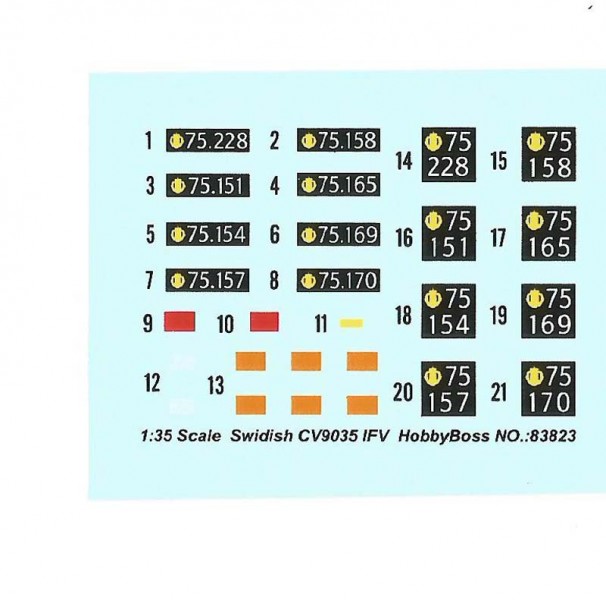
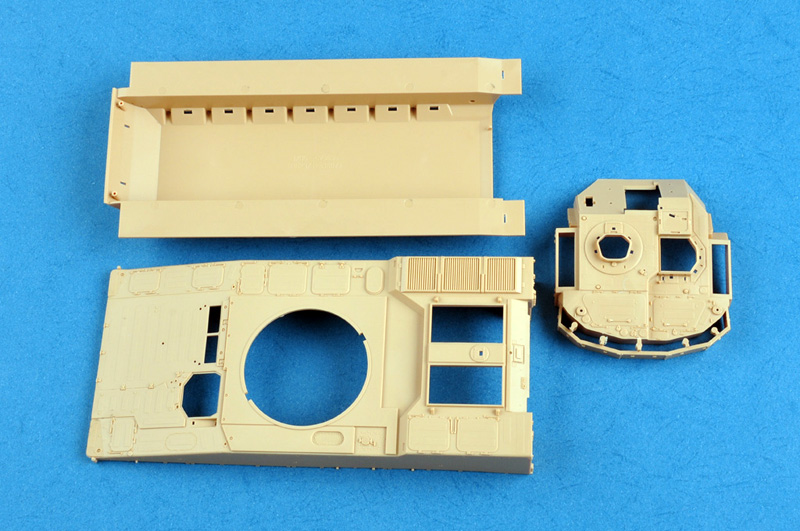
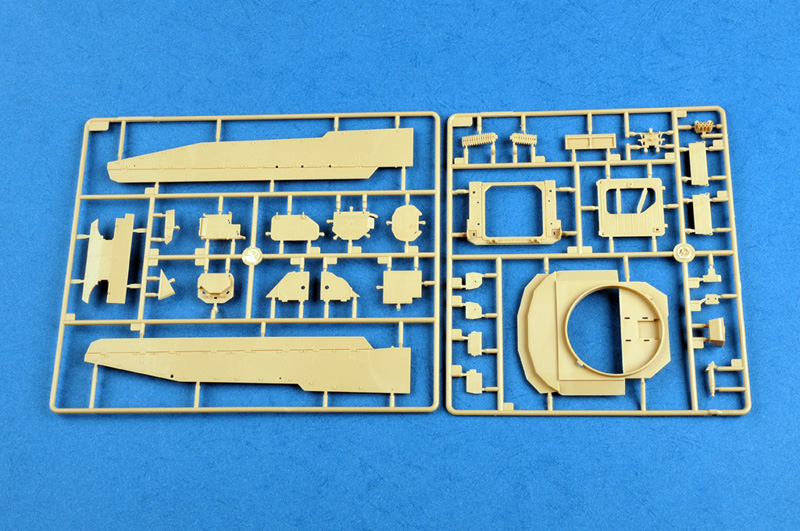
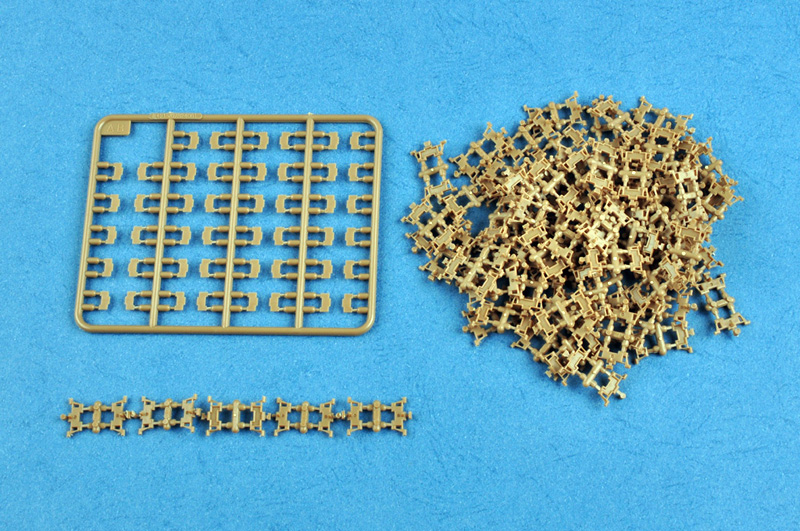
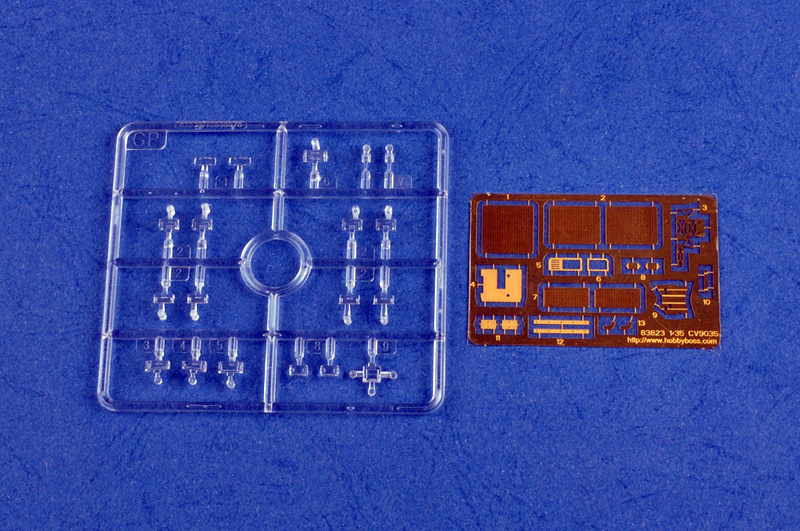
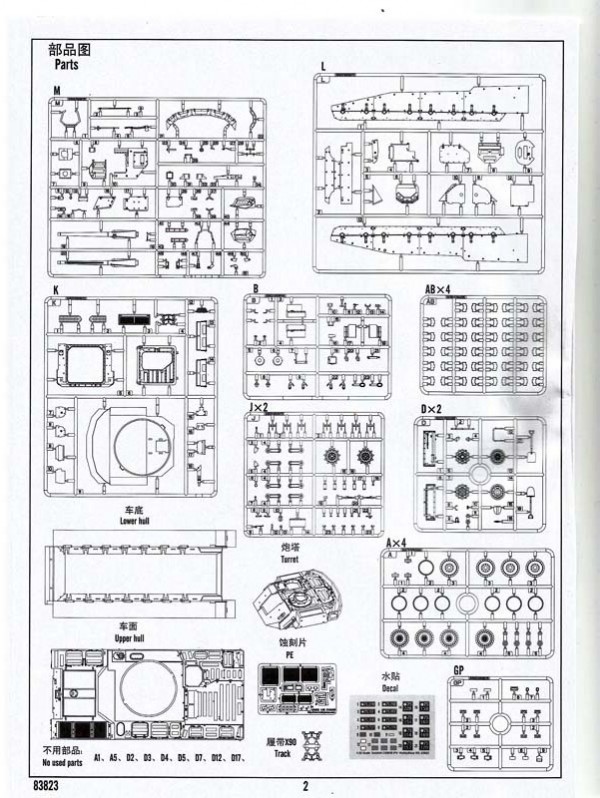
The kit is delivered in the usual cardboard box, which in the Hobby Boss case is always a good solid one. Inside are 12 sprues in 8 bags and 3 parts each in their own bags, and all in Hobby-Boss-yellow colored plastic There are also a bag of brown tracks, four sprues of brown track pads, a sprue with clear parts, a small set of PE parts, decals, instructions and a nice color printed A4 sized paint guide. The more delicate plastic parts are wrapped in protective foam inside their bag so as not to brake during transport, which I think is a nice thing.
There is nothing out of the ordinary about the part layout of this kit. They have the usual attachments pins which offer no problems in this kit. The smaller more delicate parts naturally have to be cut carefully like in any other kit. I cant resist making a small plea to all producers though; would you please stop putting parts for one step on multiple sprues! Its so frustrating having to have many sprues lying around you to find the parts you need why cant you place them together, or at least in no more than two sprues???
The quality of casting and finish is very high in my example. Clear, detailed, no flush. Good job here Hobby Boss. This goes for the instructions too. They are clear, there are no pit falls and I seriously doubt anyone will find problems assembling this kit.
The first impression is thus of a very good deal; lots of parts, good solid paging and an appealing box to get into.
The build
My build review will follow the steps in the instructions. From time to time I might comment on issues or come up with some suggestions. This is particularly true in the case when I see possibilities for improvement and/or things that need alterations.
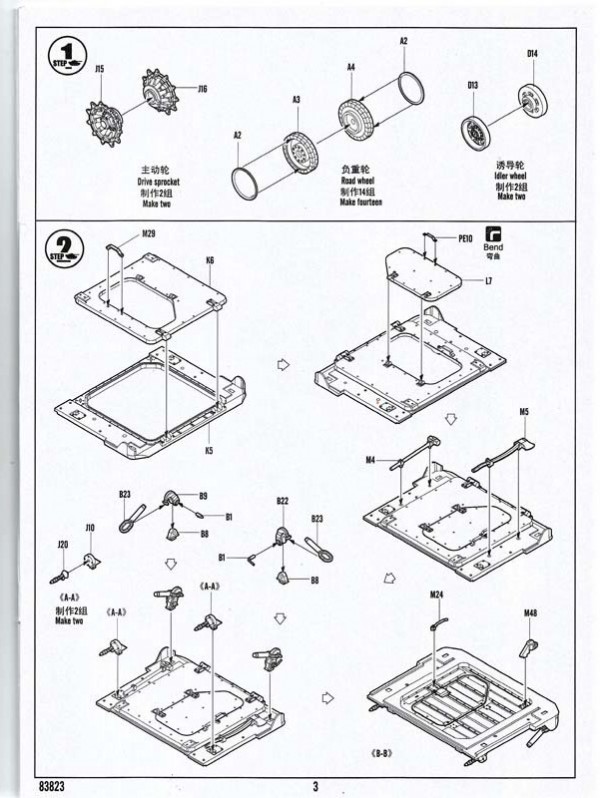
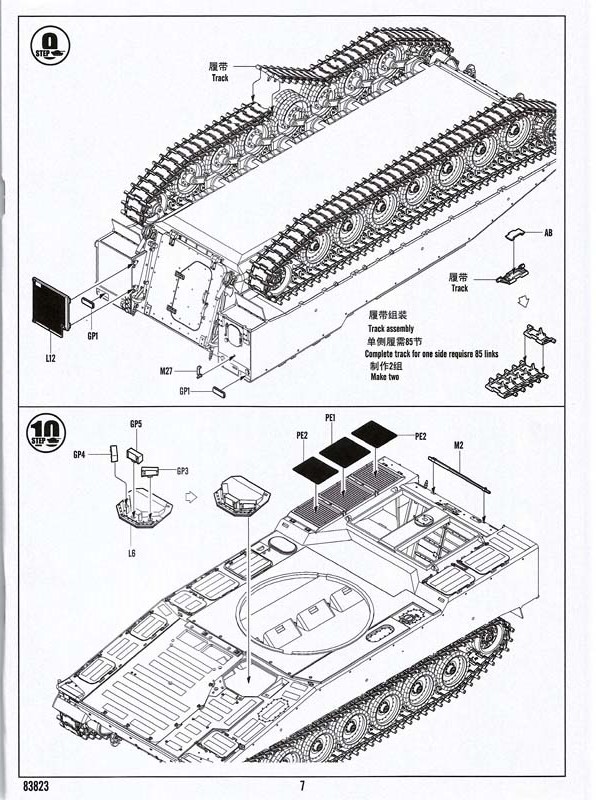
The Hull, Step 1-13 Step one to three
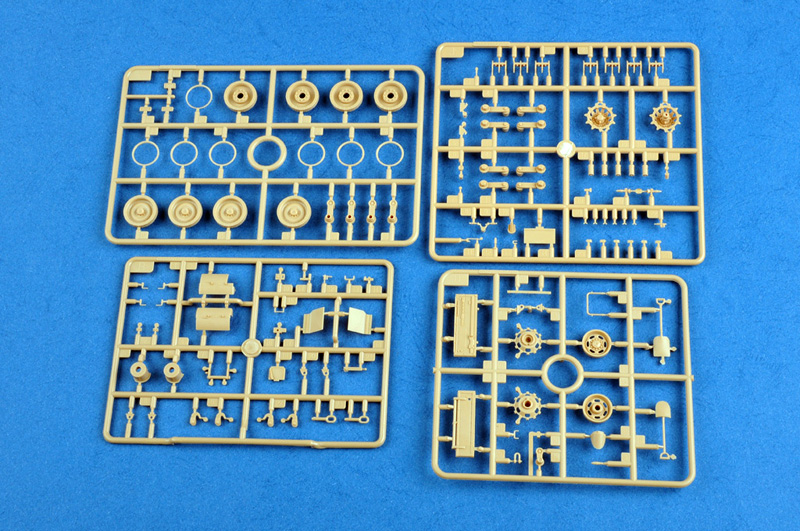
The first step deals with the idler and road wheels as well as the sprockets. Both the idler wheels and the sprockets are very good; well detailed and cleverly casted. But there are issues with the road wheels! For one thing, they have an odd pattern casted onto them? I havent been able to find any version of the CV90 family with this pattern which makes it really weird why they are there. They need to be sanded down. The rim has a u-shaped edge towards the rubber rim; this is dealt with in this kit in form of a small ring that has to be glued to the wheel. This is kind of okay that is, if the rings fit the wheels. They do not however, and you have to carefully sand them about 2/10th of a millimeter smaller to fit the wheels and there are 28 of them!
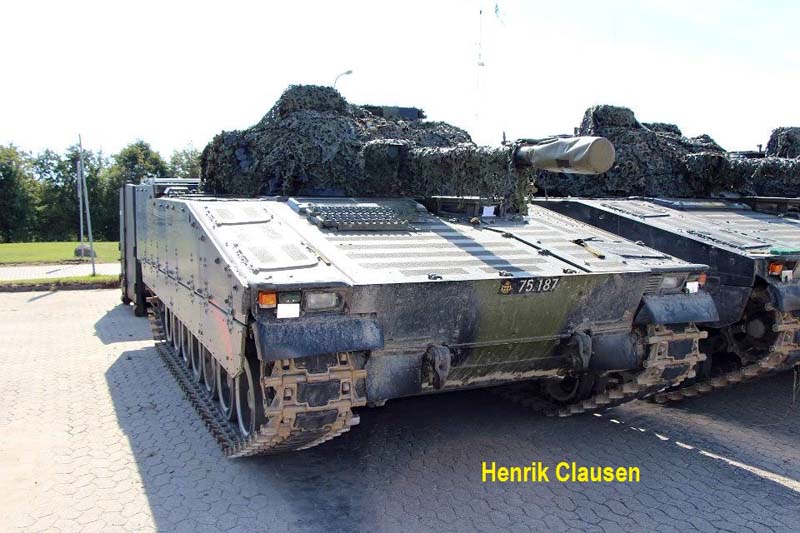
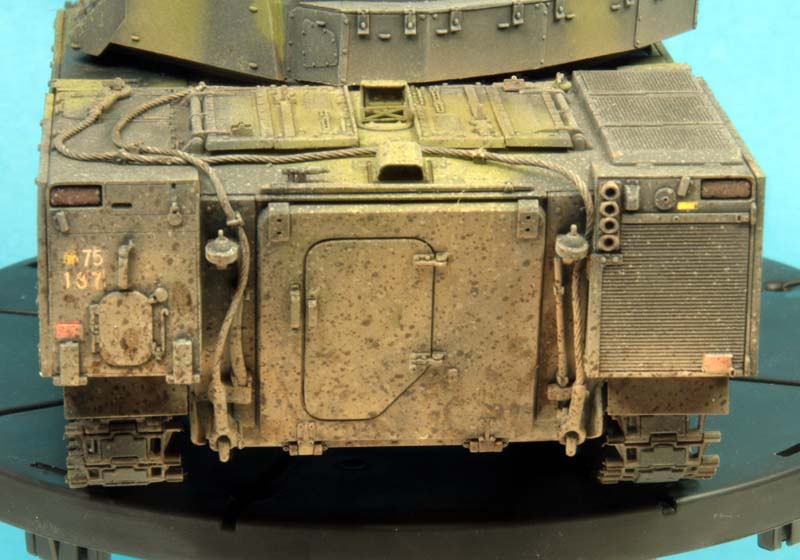
Step two deals with the rear ramp. The ramp itself is detailed on both side and the kit offers detail parts on both sides too. Now, if only anyone would make an interior kit .. Legend? Black Dog? anyone? Please? Like on the M113 the ramp has a door: I had some issues with the fit of this. In all honesty though, I probably did that myself when sanding the door. Besides fitting the ramp to the rear plate this step also add details to the rear plate. Among these are two wire ends that are to be glued to two tow hooks. The problem with this is, that this all that is ever mentioned about the wire! Ill return to this in step 6. The two hooks each have a delicate pin that would benefit from a small chain that would have been a nice addition in the PE set Hobby Boss.
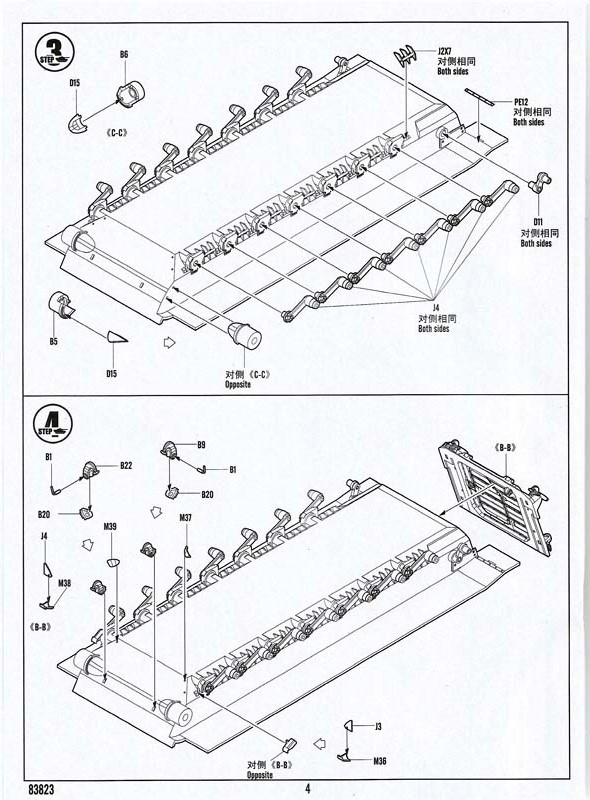
Step three deals with the road wheel arms and some other fittings for the idler wheels and sprockets. No problems here.
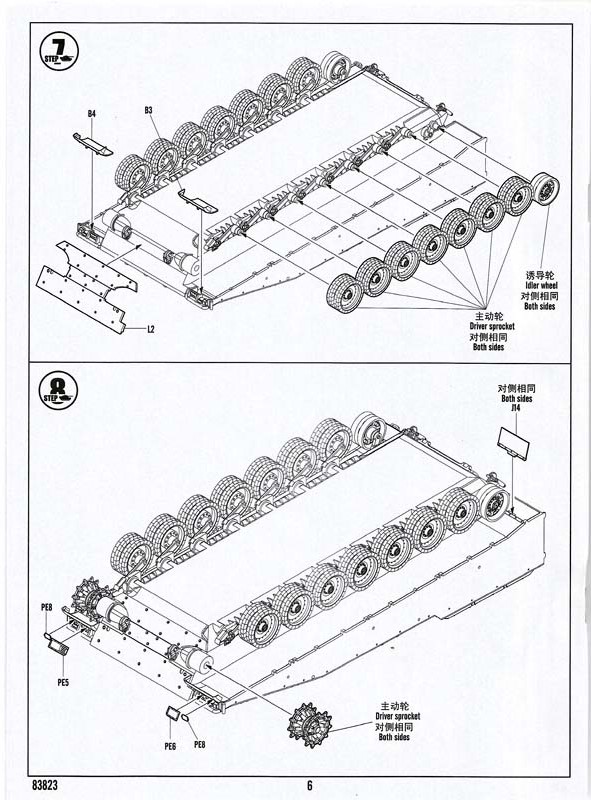
Step four, seven, eight and nine
In step four the back plate is glued to the lower hull part and some details are added to the front too. The fit between the back part and the lower hull is excellent. At each side of the sprockets there are a protection screen made out of parts J3/M36 and J4/M38. This is one of the very rare cases of poor instructions; it really took me some time to figure out how to place them correctly. My advice would be to go from here to step seven through to nine and then do step five to six afterwards. Fitting the tracks to the assembled hull is very difficult and much easier done before.
In step seven and eight you glue the road wheels, idler wheels and the sprockets to the hull; the other parts youll have to add later. In step nine the tracks are assembled. There is quite a lot of cleaning to do with these parts; it took me the better part of an afternoon and an evening to do. Once cleaned you can then just click them together. They do not, however, make a strong bond together. You can therefore spare yourself of many frustrations in making them into linknlength of them first.
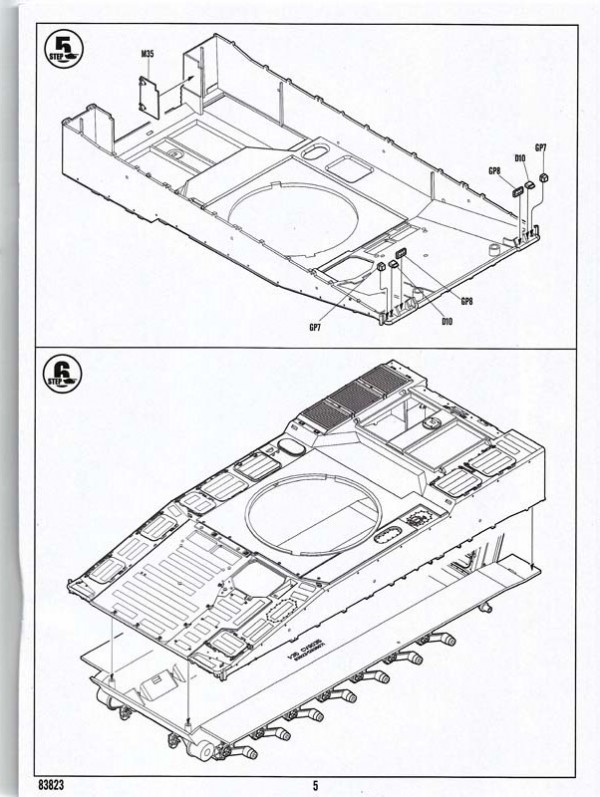
Step five, six and the remaining parts of the four previous steps.
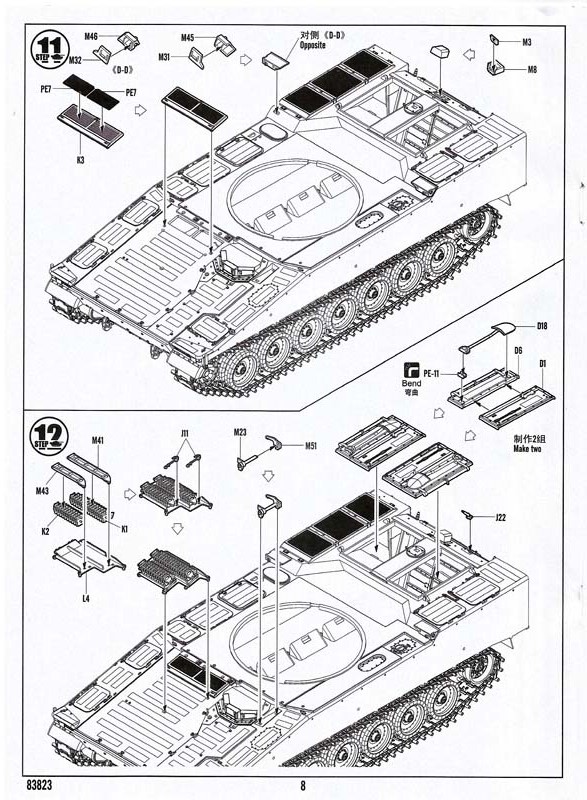
Step five preps the upper hull part for assembly. At the front the indicator, head lights and NATO lights are attached, and in the rear a plate for the exhaust door is placed. Once this is done the two hull parts can be glued together. Mine had an almost Tamiya-like fit, very good and without any filling needed.
Once this has dried for some time the remaining parts from step seven to nine can be attached. I opted to paint the parts around the headlights/indicators before assembly and then masking them off before spraying the base color. I also opted to paint the undercarriage and tracks before going on with the next steps. But that is all to one owns preference and habits.
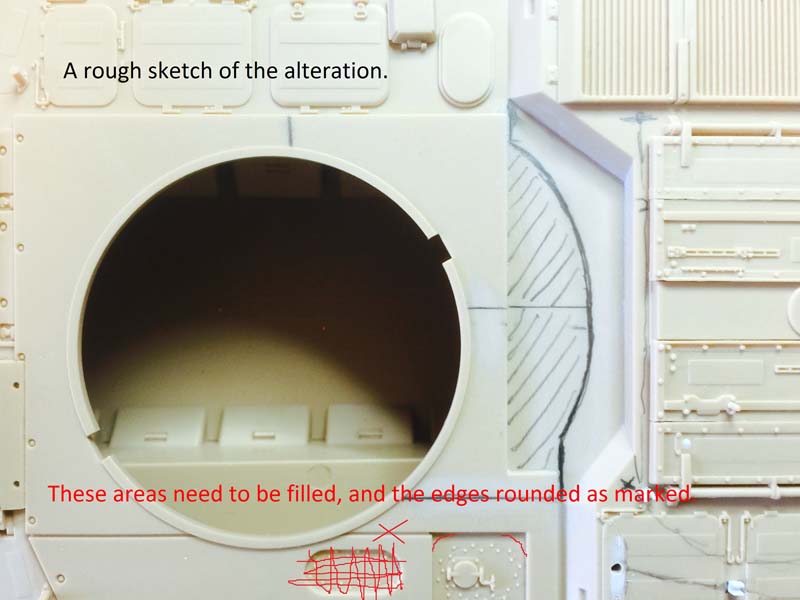
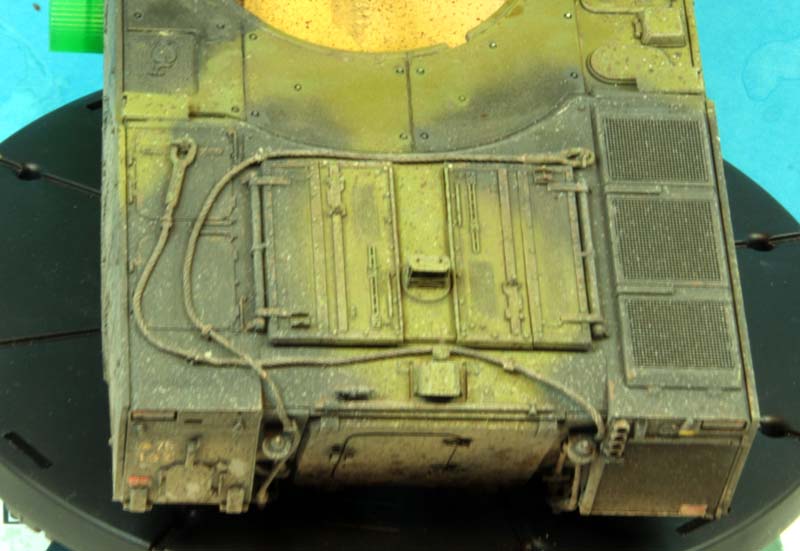
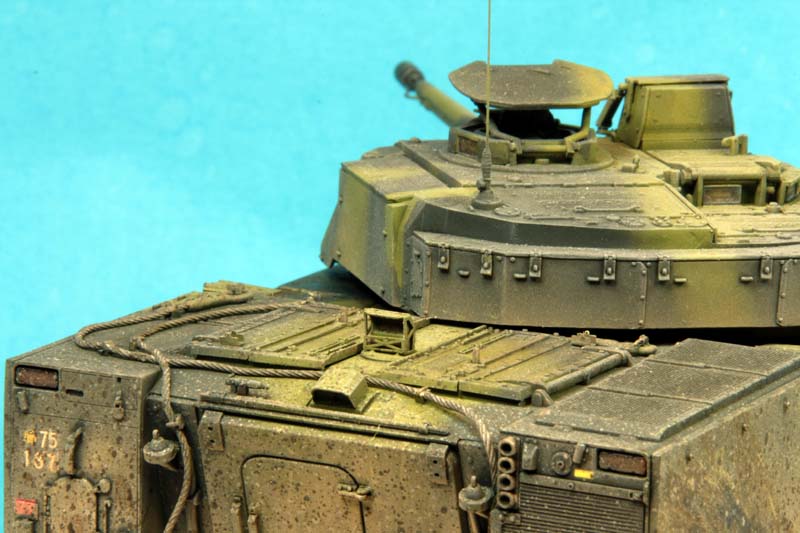
Before going any further I have to go back to the wires again because this kit has a major issue concerning this. Its not only that the kit doesnt provide information to the placement of the wire, nor that there arent all the parts for the wire either, there is something wrong with the upper hull.
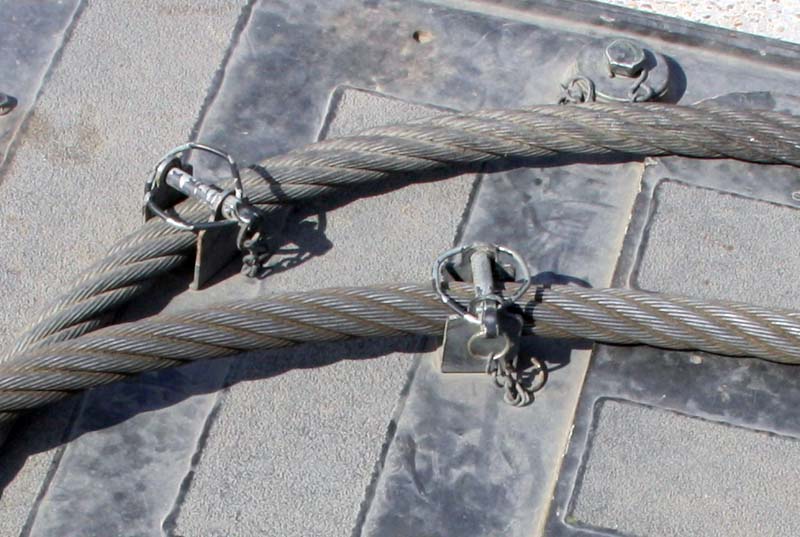
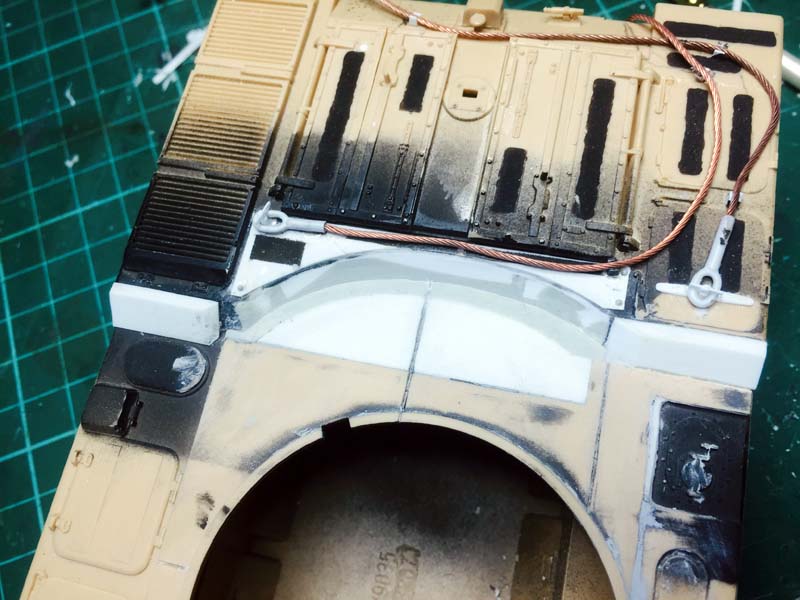
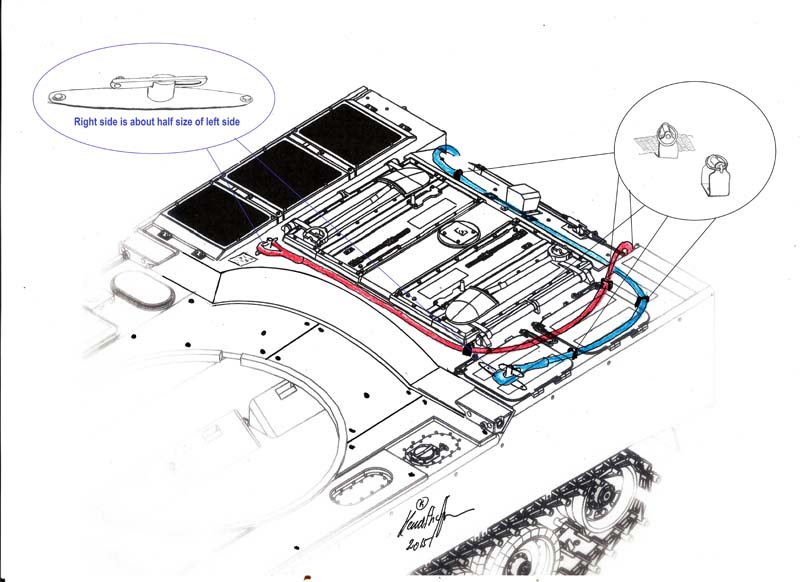
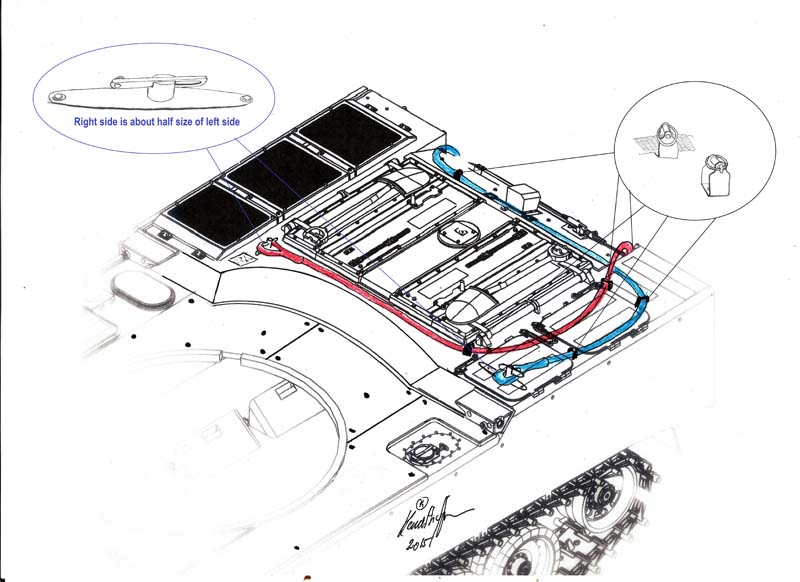
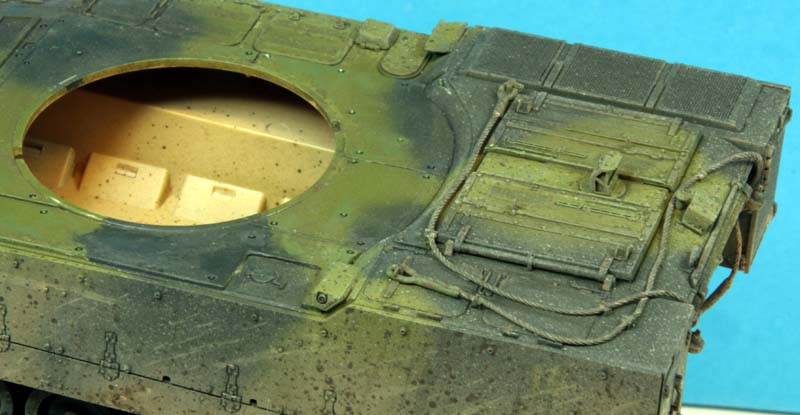
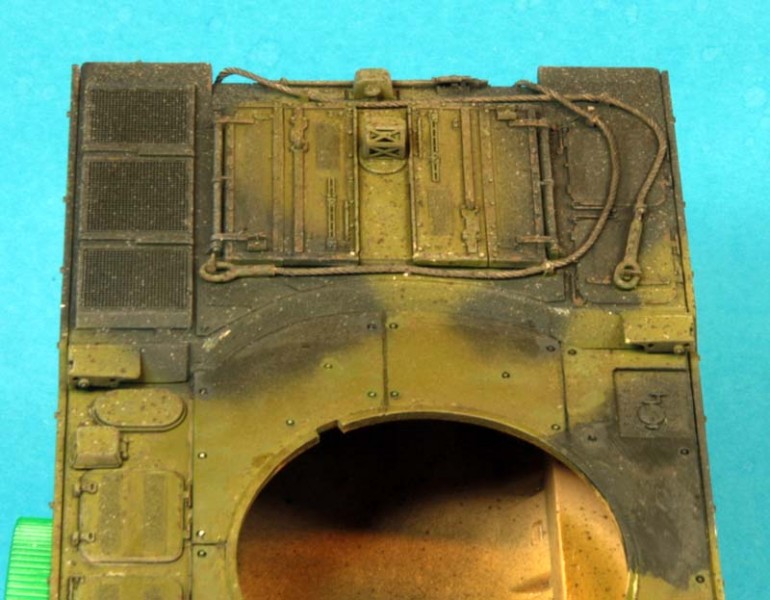
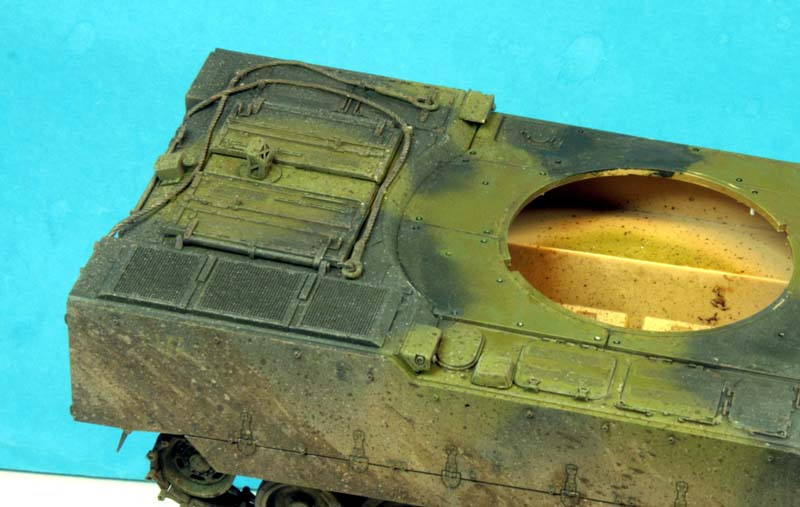
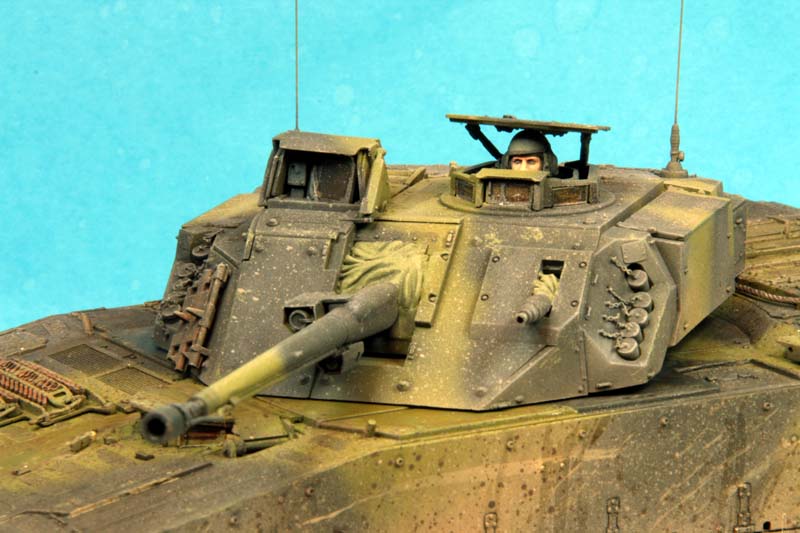
The area between the crew hatches and the turret is inaccurate all together. Ive scanned the drawing of the upper hull part from the instructions and sketched how it really should have looked like. Ive also included in-process pictures as well as pictures of the finished area. The sketch also shows how the wire is placed on top of the hull. I rebuild this area in plastic card and Magic Sculpt which was not that difficult to do; however, if you are not an experienced scratch builder then this might be a problem. The add-on armor plates on top of the hull also have to be reworked, and recessed fitting bolts added too. My wire is a Eureka wire for the Leopard 1 and 2 tanks; Im not quite sure this is accurate, but it looks very much to be the standard 25 ton wire also used on the Leopard family in the Danish Army. The wire brackets on the hull are all made from plastic strip if any company should ever make a PE set for this kit, then theyll be wise to include these as well. It really puzzles me how Hobby Boss could make this mistake? Everything else is bang on and the hull part is re-worked anyway?! One consolation, however, is that once the turret is in place the mistake can hardly be seen. But a cock up none the less I think.
Step ten to thirteen
These steps finish the hull. And what a finish! Hobby Boss certainly redeems themselves. In a hail of highly detailed plastic parts, cleverly opted PE parts and clear plastic parts you end up with an exceedingly detailed hull. Let me point out a couple of examples. The drivers hatch is made up of only seven parts (note for Bronco, more parts dont always make modelers happy!) yet you are left with a highly detailed part of the hull. The periscope are made of clear plastic; a good tip is to paint them with a diluted brown ink first. Another example is the squad commanders rear periscope. A cleverly engineered mix of a clear plastic part together with a PE part its really well made and looks astoundingly when finished. And then there is the snow grouser rack, or the armored side plate, or or . or the . well, anything else for that matter.
At the end of step 13 you are left with a beautiful Cv90-something hull - . Only, not an accurate Cv9035 hull.
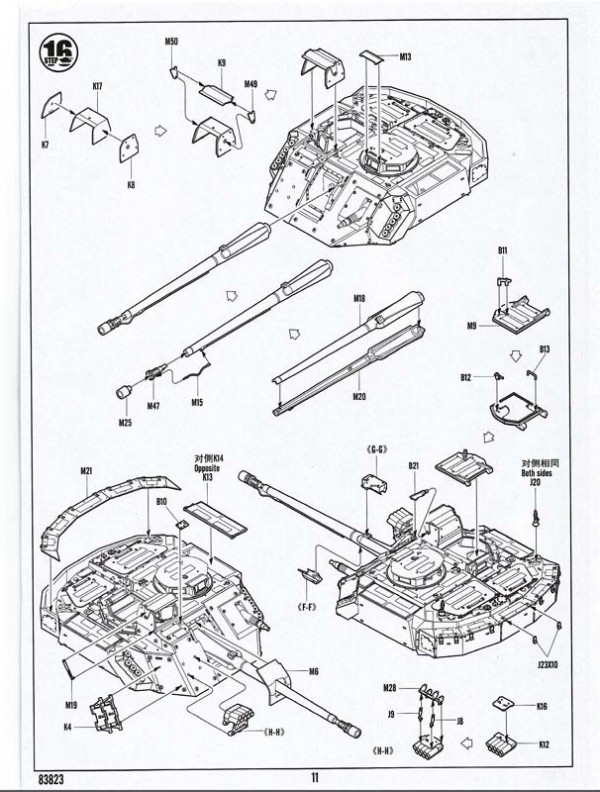
The turret, step 14-17
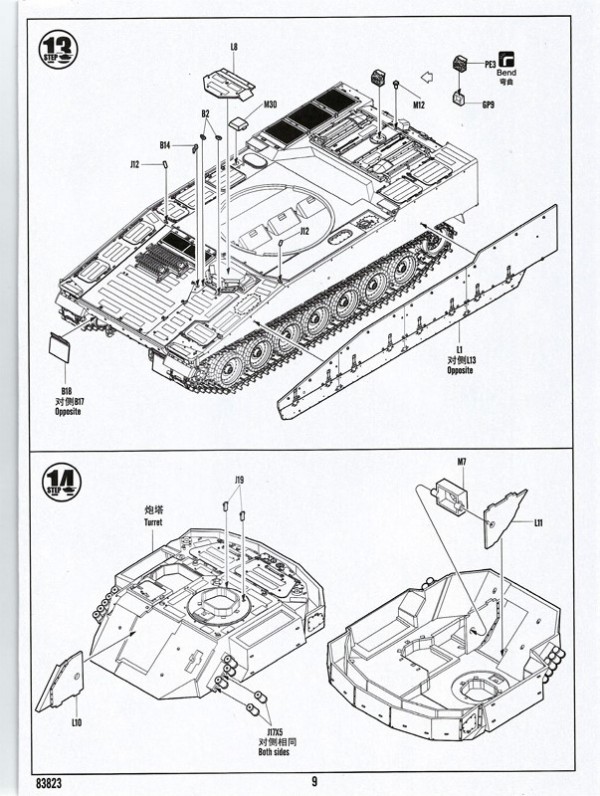
Step fourteen
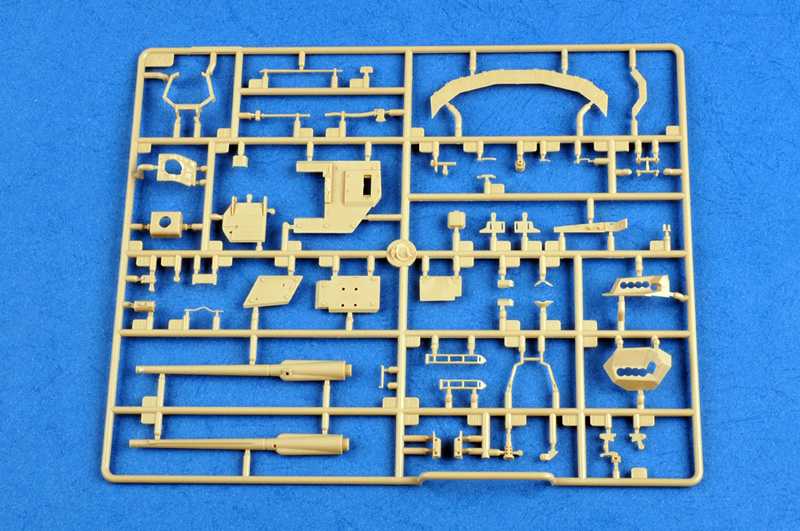
The Cv9035, as well as CV9030, has a very different turret to the previously released models. The lay out of the turret is very conventional, there is a top half, a bottom half and a lot of add-ons. Step 14 starts by adding a side wall to the right of the main gun, the smoke dischargers and some fittings for the main gun. Everything fits well and all looks good when placed.
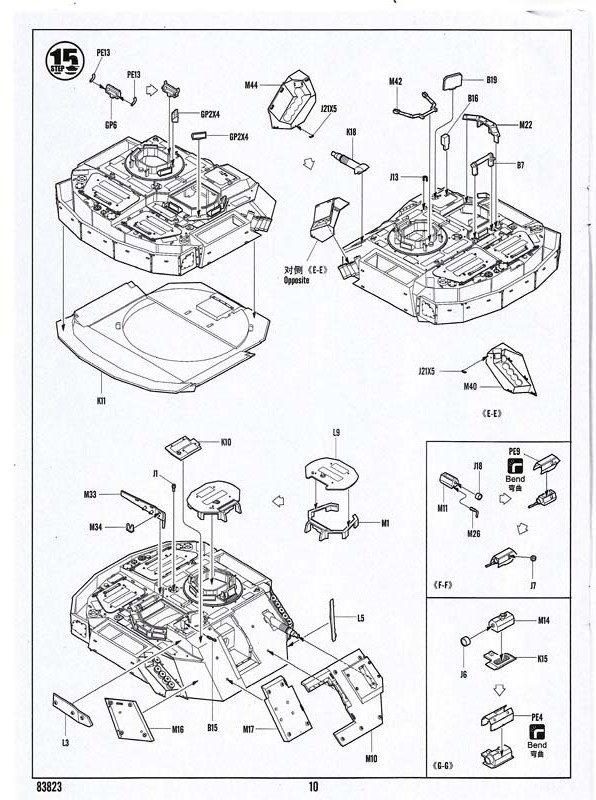
Step fifteen
This step mainly deals with commanders and the gunners hatches. All periscopes are provided in clear plastic parts which is very nice. At the Commanders front periscope one has to put two PE parts also. As I write this I must shamefully admit that I have forgotten to do so. Once the periscopes have been placed there are some parts for the protection bars added too.
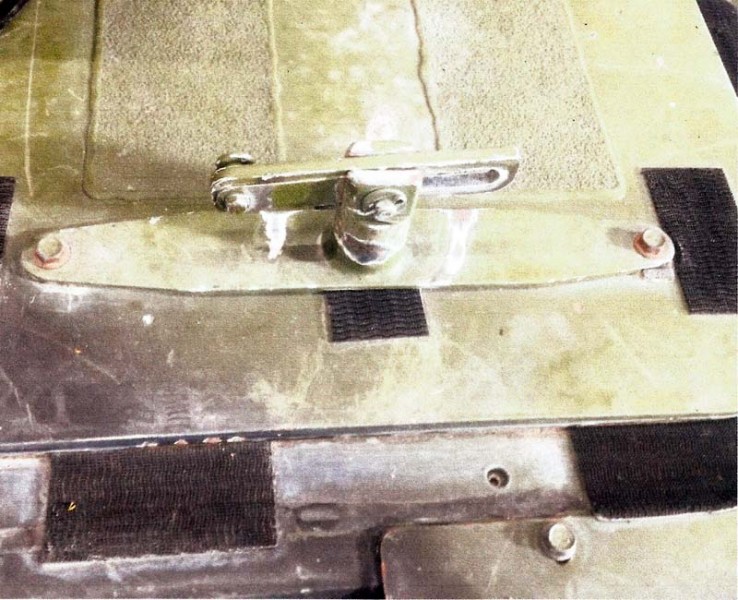
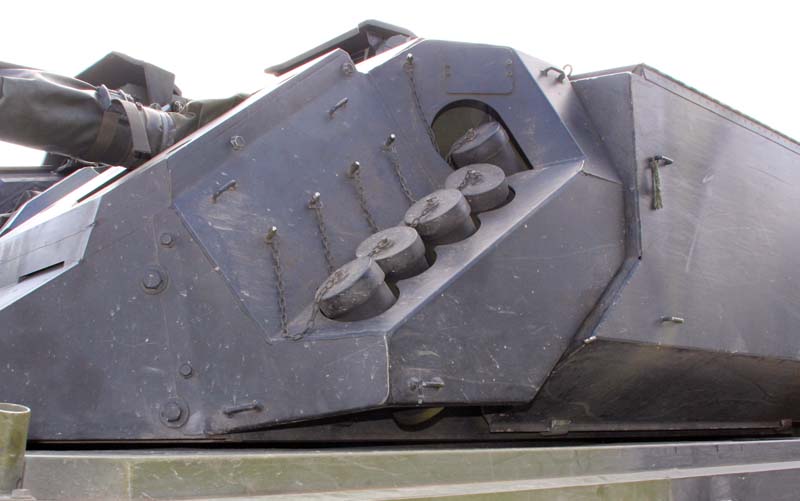
In this step the shields to cover the smoke dischargers are prepped and added. The shields need to have tie downs added. The parts provided for this, however, are very different from those already cast to the turret. I therefor found a top hull part from a M113 kit and took the tie downs from this. There are no chains for the smoke dischargers; I really dont understand why producers still miss this very important item when they make PE parts anyway? It makes such a different to a model. I used some from my spare box. The chains are connected to the turret with some pins and they were made with 0.3mm Plastruct round rod. They have an odd arrangement so please check my photos for reference.
The CV9035 uses an UTAAS sight and some of the parts for this are glued to place in this step too. For some odd reason, however, these parts are not made in clear plastic? They are, however, very detailed indeed with even the wiper arm clearly manufactured.
At this point Ill recommend giving the glue a brake to dry before you carry on.
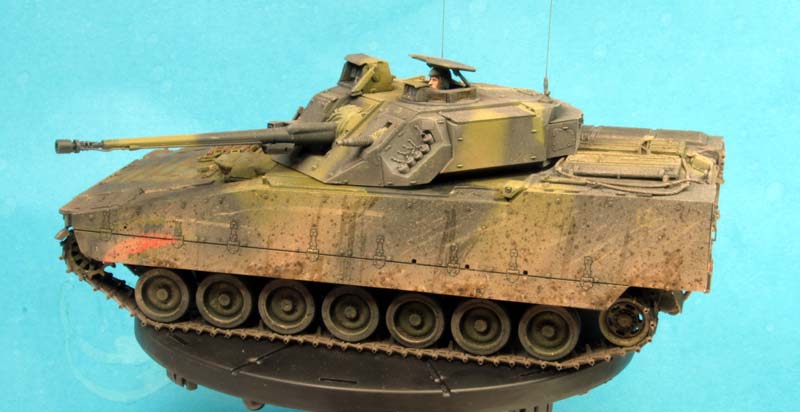
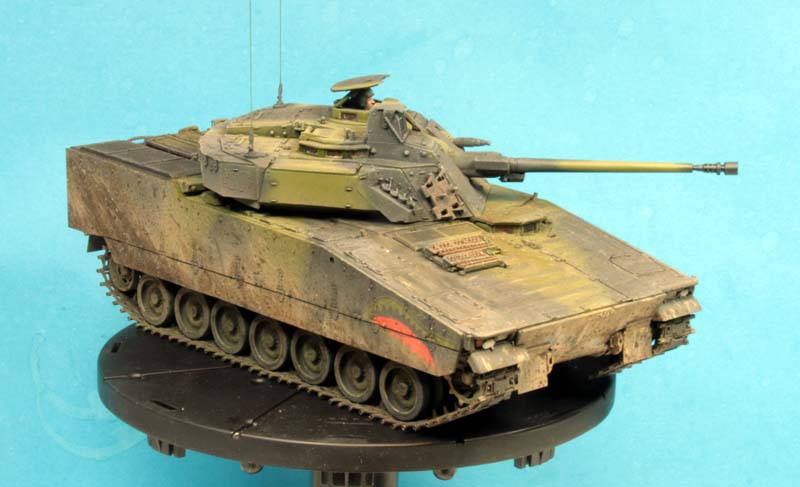
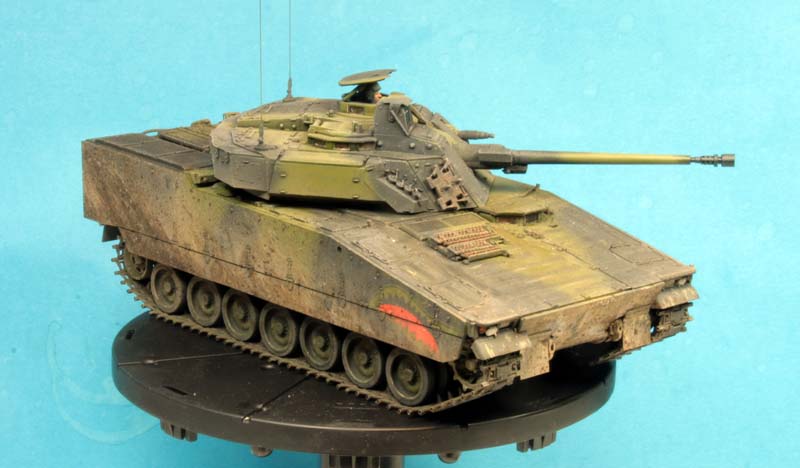
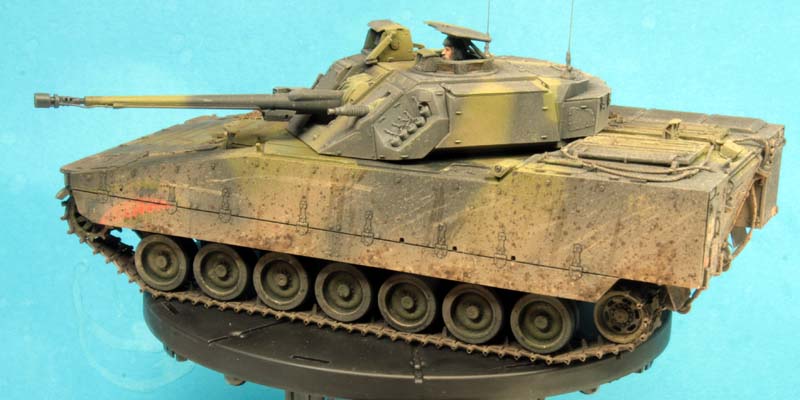
In the second half of this step many of the add-on armor plates are glued to the turret. All these parts look astounding and have a very good fit nice job Hobby Boss! Then the commanders cupula is finished. Ive opted to have my commander sitting under the hatch as this is possible with the Cv90 vehicles. This makes an interesting change from my other models I think. The figure has the torso from my spare parts box and a HUH7 Hornet head. The figure was painted and left for final assembly together with the commanders hatch. As the last part the co-ax machinegun is installed too and the parts for the two barrel camera and reference system are assembled.
Step sixteen and seventeen
The main gun is made up with five parts. Conventionally there are the two halves for the barrel and then there are three parts for the muzzle. The 35mm Bushmaster III main gun has a reference system at the muzzle and the parts for this give you a good model of this. My recommendation is to assemble the muzzle first and then leave it to dry. In the meantime you can assemble the main gun and leave that to dry also. After an appropriate drying time the barrel can be sanded and the muzzle attached. Here too the fit is excellent; I would, however have wished for a little longer pin to go into the barrel as the one makes the assembly somewhat unsteady. Then the references system and the camera from the previous step are attached. In the end you are left with a very, very good gun for your IKK.
Next is the protection shield for the gunners sight. This is a little fiddle so one has to be a little carful with this. You can only make this in the open position; if you want to have it closed youll have to rework parts M19 and B21.
The rest of this step deals with the gunners hatch and some bits and pieces for the turret. Among these there are three things Ill make some comments on. First is the attachment of the Hoffman device to the right of the main gun. AS far as I can tell from pictures this was something that was only used in the beginning. Later the Canadian system for the Leopard 2 has also been used. Ive opted not to install it at all. The other thing is about the hood for the main gun as well as for the machinegun. The part from the kit has very little detail to it so I made new ones in Magic Sculp. The third and last item is something about the antennas. The IKK has four mounts for this; two at the rear hull and two on top of the turret. The hull mounted is for the more bulky type of radios, like the VRC 2061, whereas the turret mounted is for smaller sets, like the Harris 152. The exact choice of sets varies from operation to operation.
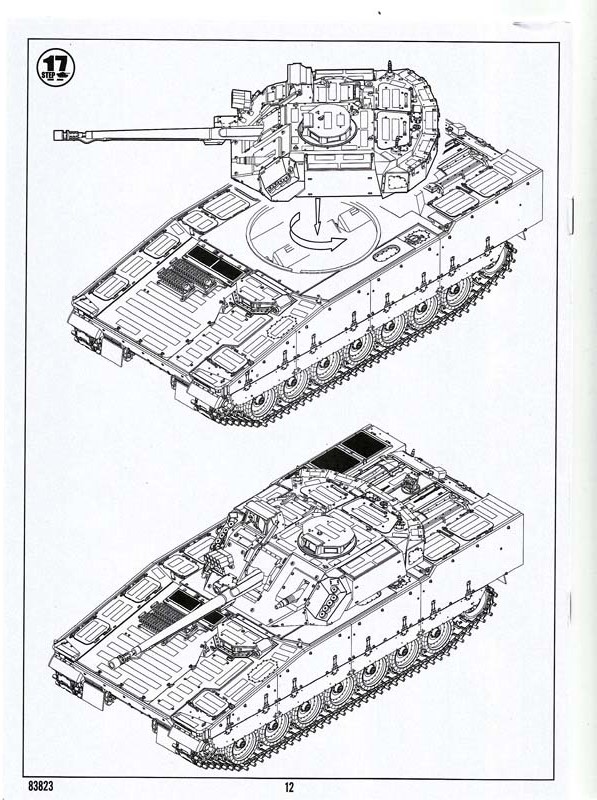
With this the turret is finished and all you have to do in step seventeen is to put the turret on the hull.
Painting the beast
I dont want to go to great details with this as I use conventional technics and products. I finished the undercarriage first. I usually paint the hull, the wheels and the tracks separately. This gives you better room to paint than youll have once they have been assembled. For the tracks I make a mix of Tamiya steel, chocolate brown and mix some blue and brown ink to it. This gives a nice steelish appearance as a base coat. This basecoat is then given Migs track wash and some mud/earth washes too. The wheels and the hull are painted and weathered conventionally.
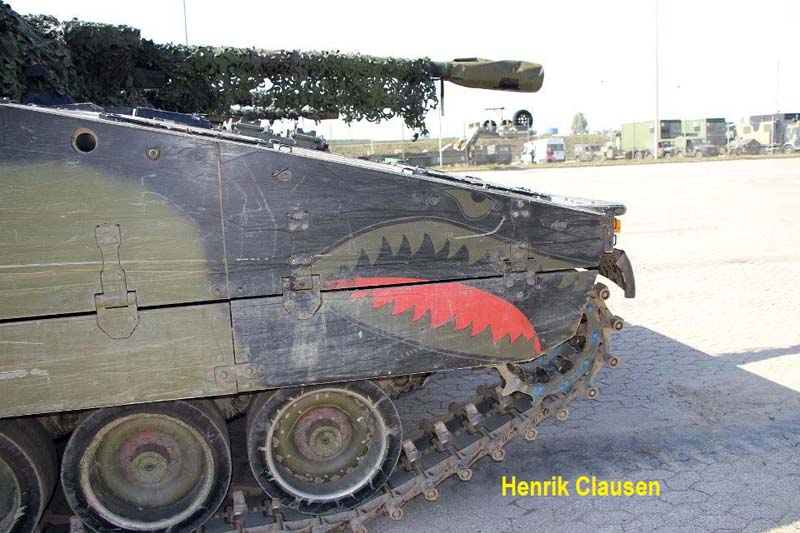
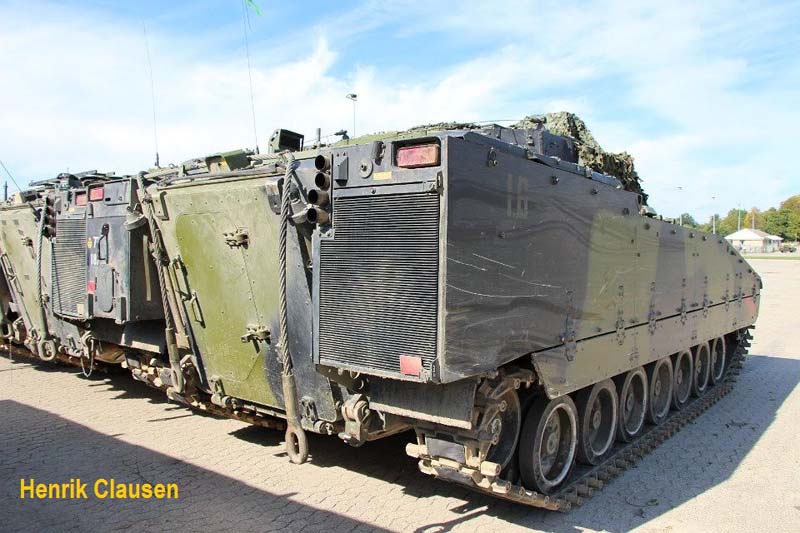
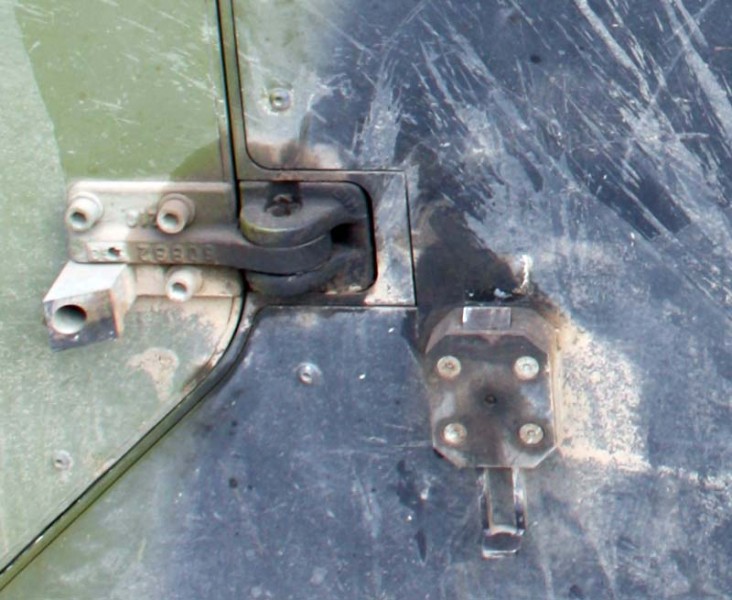
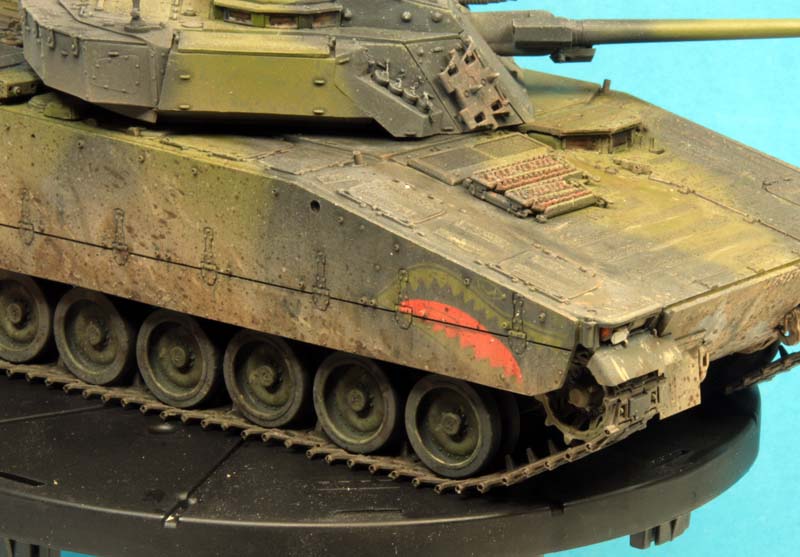
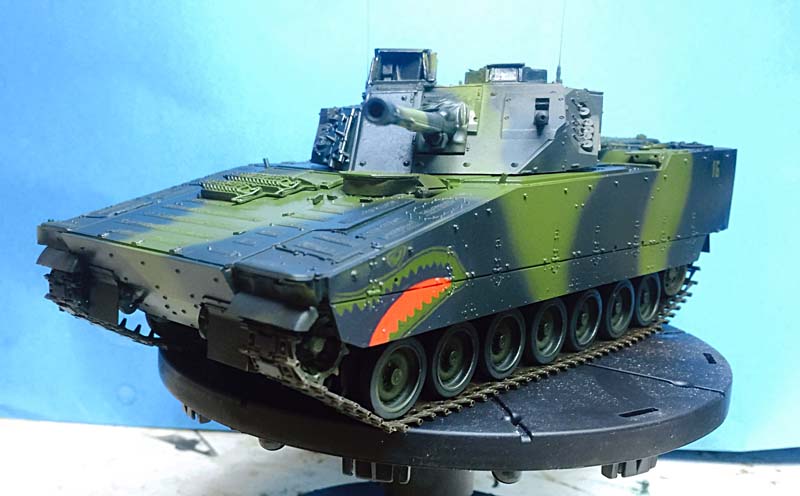
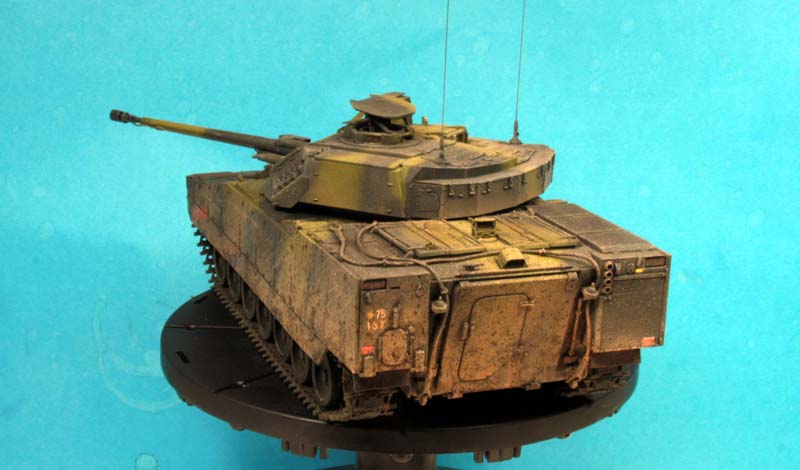
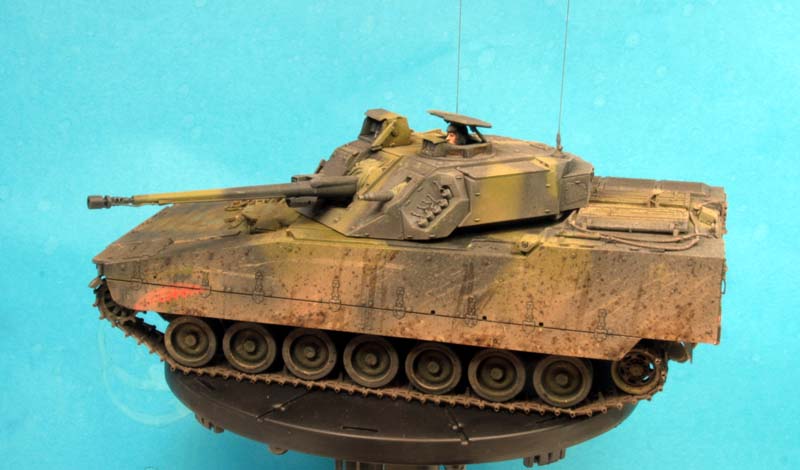
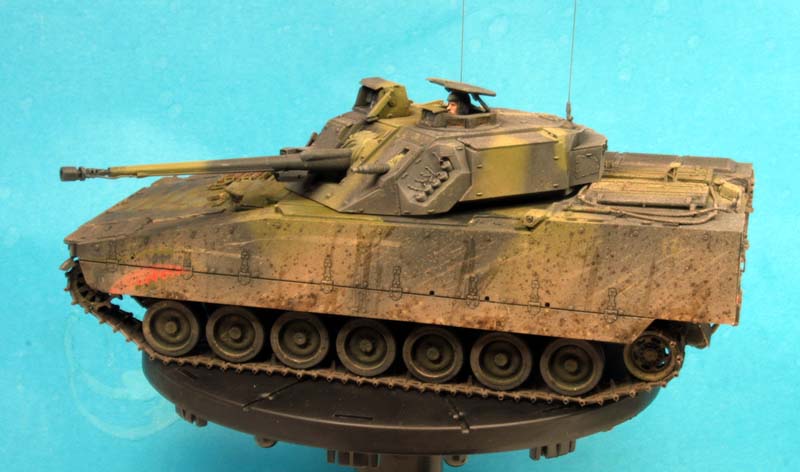
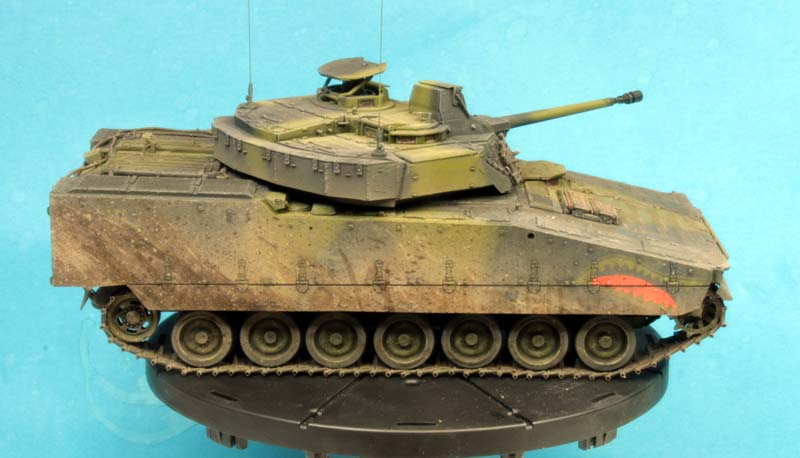
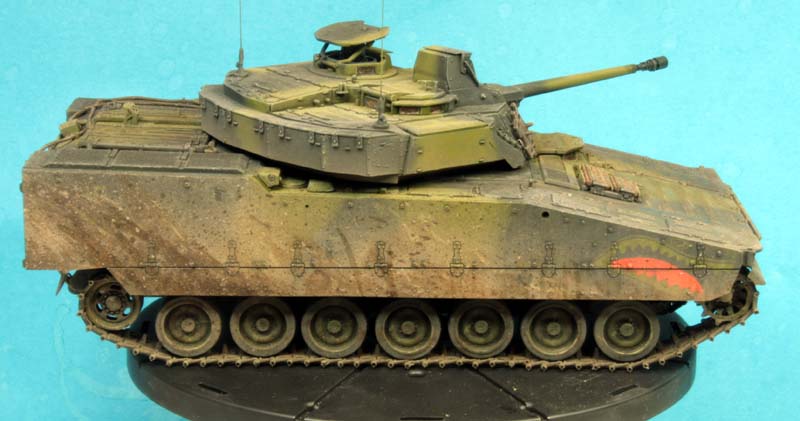
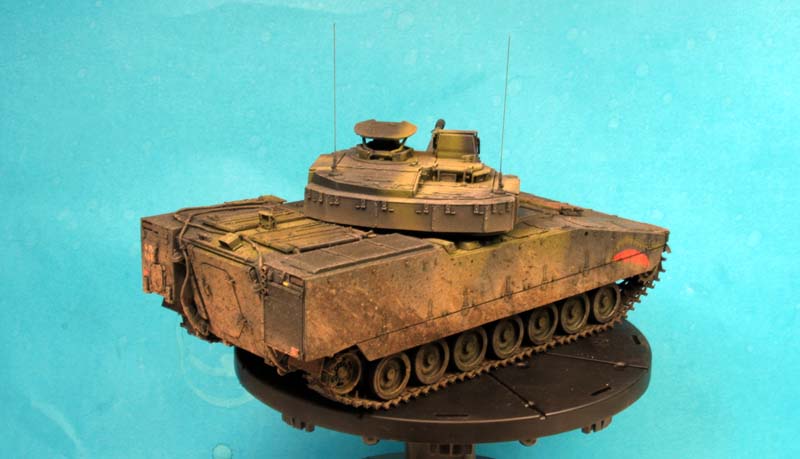
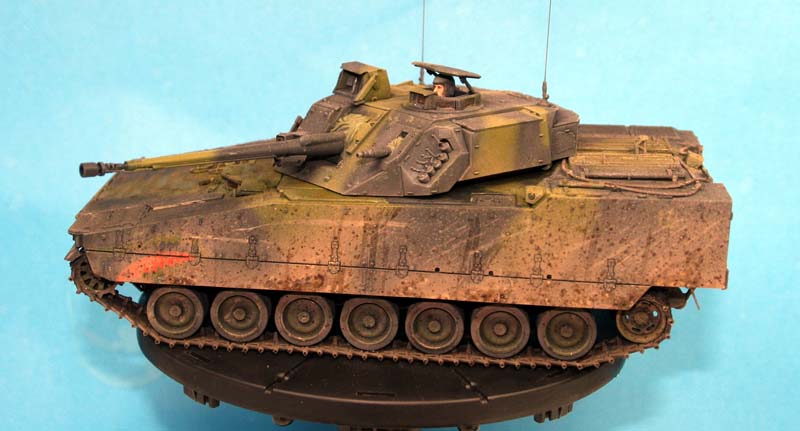
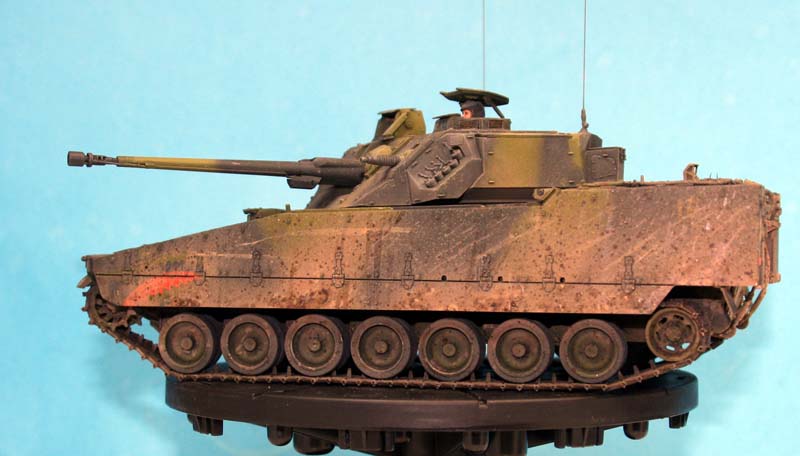
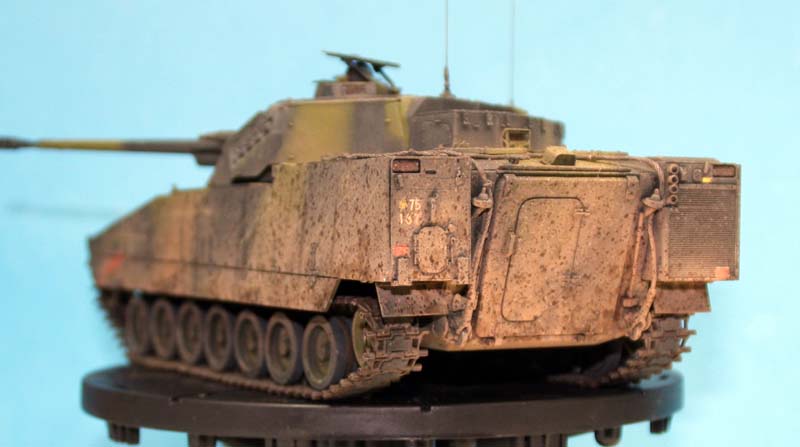
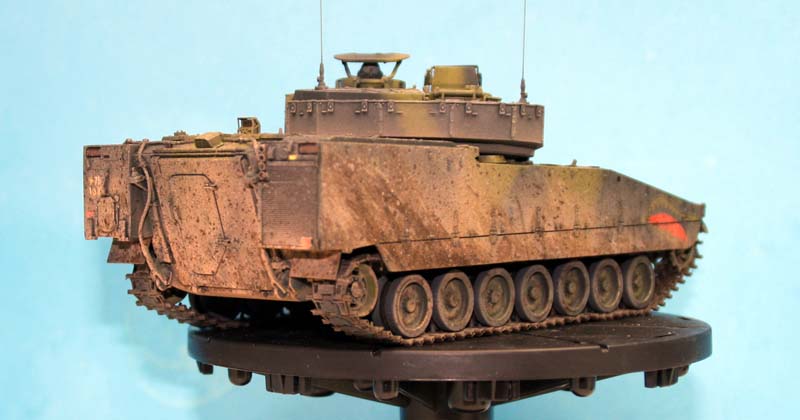
For this particular model I had to paint the sides before assembly. Ive included some reference pictures of a vehicle from first platoon IKKCOY from GHR. I chose this because of its awesome graffiti at the front. The sides were therefor sprayed first and the shark mouth hand painted on later. The number 1.6 at the back end was masked before the black part was sprayed on.
During the assembly I painted all the anti-skid patterns with Citadel Typhus Corrosion. This gives a grainier look to these areas. To sell them I usually paint these areas with Tamiya Extra Thin Cement.
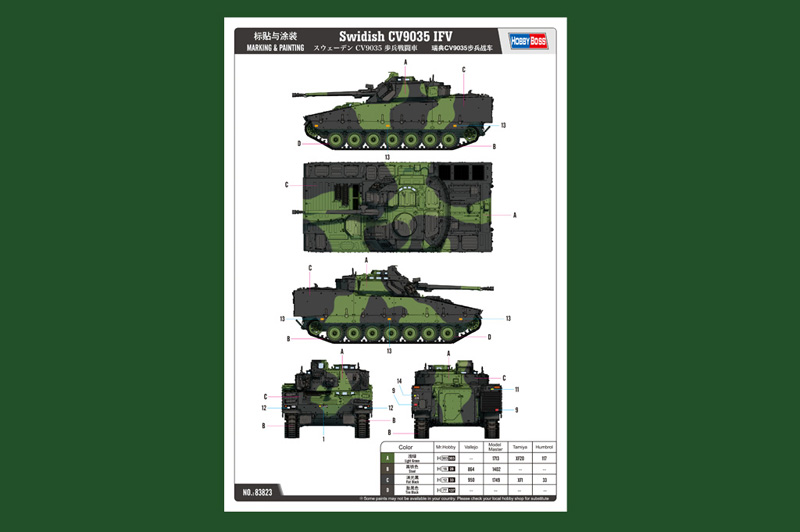
The main issue with painting Danish vehicles is the green. For me this is no problem as I use original army color, only toned a little. But as this color is not found in any paint range other modelers are faced with a challenge. Here are some solutions.
1) Humbroll no 150 has a pretty good resemblance, especially if youll give it a brown wash afterwards.
2) John Murphy has in the series How to build. (The Leopard family in 1/35) pointed to a mix of LifeColors IDF Green (UA903) and Games yellow ink. This works find as well I think.
3) Bernd Zaske uses a mix of Tamiya XF-4 Yellow Green and Tamiya XF-67 NATO Green in a build of a Danish leopard two described in an article called Skørt Leopard available from Leopard Club here.
4) For touch ups I usually make a mix of Vallejo 890 (Reflective green), 891 (intermediate green) and 815 (Basic skin tone); this can be mixed with window cleaner and sprayed too.
For the black areas I use Tamiya NATO black.
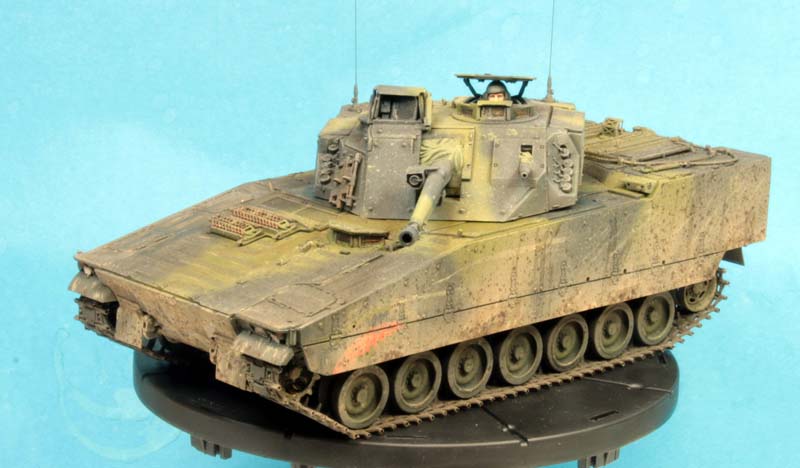
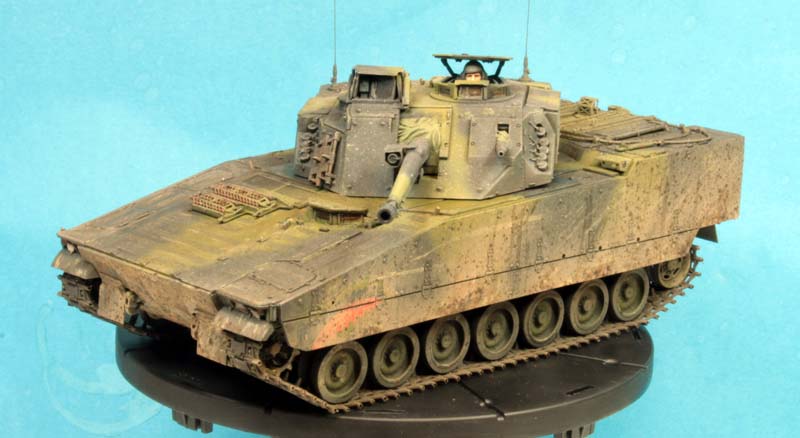
I wanted to give my IKK a very muddy appearances as this is how I remember vehicles not the IKK though, I am far too old to have done service on this Im afraid. To obtain this Ive used a variety of MIG and AKK products in the way often described in articles on how to weather a vehicle. The only thing (I think at least) that I may vary this is I also use clear coats to give a more wet appearance at selected areas.
Conclusion
So what to think about this kit? The top rear area of the hull is inaccurate! There is no doubt about this. If you want an accurate model of the CV9035 IKK youll have to deal with this. This IS a cock up Hobby Boss
!
However, I wonder if the average modeler would even mind that the area under the turret is not correct? And the more puritan modeler is he going to be set off by what is only basic scratch building? The answer to both these question in my opinion is, of cause no.
Then there are the small issues, like the wheel rings? An annoyance yes, but when was the last time you build a kit that didnt needed sanding and adjustments? And furthermore everything else is really, I mean like really, really good. Its an easy build, its highly detailed, cleverly engineered and, most importantly, it looks like the real thing!
I for one will not have any hesitation to recommend this kit to all kind of modelers. Its too beautiful to miss in a collection. And hopefully this article will assist in your build.
SUMMARY
Highs: Affordable, highly detailed, good mix of media, easy to build.Lows: It has a major issue with top of the rear hull, which is inaccurate.Verdict: I love this despite it's errors. Buy it, you´ll get a wonderfull model for your collection


Comments