Brief Introduction to the Willys Model MC Jeep the M38
The M38 isnt very well known outside of collector, fanatic or Jeep Owner circles. Visually similar to its predecessor, the WWII era Willys Model MB Jeep, the M38 Model MC really is a different truck. It is as if Willys sat down with WWII Jeep drivers and asked for a laundry list of things that theyd like addressed in a new truck model. The M38 is the result of incorporating these ideas.
The Model MC is slightly larger, offering greater room for the driver and boasting an improved transmission. Casual inspection shows the M38 differs from the WWII-era Model MB with a one-piece Windshield Glass, Tailgate, larger tires, protruding Fuel Filler on the body side, larger and bulging Headlights where the earlier Jeeps had recessed units and Pioneer Tool stowage relocated to the right side. The M38 Jeep, like other post-WWII tactical trucks, had a 24-volt electrical system and was the first Jeep to have such where the WW II Jeep had a 12-volt system. The Model MC Jeep carried a battery under the Hood and a second battery in a compartment inside the cowling in front of the passenger. Willys produced 45,373 Model MC Jeeps between 1950 and 1952.
Plus Model attempts to provide the modeler with an easy and inexpensive conversion set to model this important Jeep variant using available model kits of the Willys MB but misses the mark in accuracy or being complete. In reality, there are actually few parts interchangeable between the WWII-era Model MB and the later Willys Model MC Jeep despite the visual similarity. If built as it comes, the incomplete Plus Model Conversion provides the modeler a miniature something akin to a VISMOD of the M38 Jeep.
In the historical photo at right, the Willys WW II-era Jeep is center left, with the M38 Model MC at center right - you can better see the size difference between these two trucks.
General Data: Willys Model MB and MC Jeeps
Successfully completing the Plus Model effort relies on using donor kits; either Italeris older Willys MB Jeep, or Tamiyas latest Willys Model MB Jeep but neglects to provide the modeler with the single most important part necessary to make a successful conversion a proper Body Tub to work with.
The instructions do point out obvious modifications for the modeler to accomplish in reworking their donor Model MB Body Tub to accept the parts Plus Model provides, but in terms of completeness, they fall short in truly replicating the improvements and changes found in M38 Jeep. I probably should have known by the low cost of the conversion set that it wouldnt have a complete Body Tub but I couldnt pass it up and purchased three for review and my personal collection.
Since Skybows announced M38 Jeep never materialized, the only contemporary 1:35 scale effort that one could compare to the new Plus Model set is the long out-of-production RC Berg Ltd kit. You can occasionally find the RC Berg conversion on e-Bay for decent prices, and it is worth purchasing. The RC Berg kit is also based on using Italeris decent WWII-era Jeep as a donor kit, but this conversion goes the extra step in providing the modeler with a complete Body Tub for their modeling effort. Richly and accurately detailed, the only niggling point I have with the RC Berg conversion is that it likewise is too small in some dimensions as it was mastered on the Italeri Jeep Body Tub and doesnt quite look the part parked next to a scale Willys MB Jeep miniature. When viewed singularly, the difference between the two Jeeps isnt easy to spot until Model MB and Model MC trucks are parked next to each other.
Both the Willys Model MB and Model MC Jeeps have an 80-inch wheelbase in common likely prompting the idea of an easy modelers conversion in the first place. They look alike in many areas too, further encouraging the effort. However, the similarities between the two trucks diverge from a common wheelbase, and parts from the two trucks are not directly interchangeable in most cases. While not intending to belabor the point further, Ill list some of the differences between the two trucks below for the modeler ultimately to decide whether or not to apply effort in their own miniature project:
Tires: The WWII Model MB Jeep used 6-ply, 6:00 x 16 NDT (Non-Directional Tread) tires. The Model MC M38 Jeep used larger 6-ply, 7:00 x 16 NDCC (Non-Directional Cross Country) tires from GoodYear and BF Goodrich. Both trucks could be seen with Combat Tire/Rim combinations in service but note that only the M38 Jeep prototypes commonly used Combat Tire/Rim combinations. The M38 Jeep used special steel safety rims.
The tires mounted on the M38 Jeep coming out of the factory were NDCC-types from the two suppliers above. Also fitted during its service; Cooper, Firestone and Seiberling Special brand tires could be found on the M38 Jeep.
The Tires provided by Plus Model here are Firestone NDCCs, with delicate brand name stamping on the sidewall. They are slightly wider than the Tamiya Jeeps combat-rimmed NDT Tires in both width and diameter which conveys the size difference adequately. The NDCC tire has a more rounded tread edge than the square-looking NDT tire.
Can the M38 Jeep run on the smaller WWII era tires? Yes, they can be fitted to the M38 Jeep, with penalty being a rougher ride for the occupants.
Chassis/Frame: Since none of these components are provided by Plus Model, the modeler must opt to using either Tamiyas or Italeris Willys Model MB Chassis/Frame subassembly. This will get the modeler to the desired 80-inch wheelbase sported by both truck variants, but further adjustments are called for.
The M38 Model MC Jeeps frame is a heavier than the Model MB Jeep beefier springs and better reinforced, with a different rear cross-member. As these features are not readily visible in a 1:35 scale miniature, many modelers might not feel the need to get deep into this area I plan to do a buildup later on that sheds more light here.
Angle of Approach: Looking at the two trucks from the front, the M38 Model MC has a 55-degree angle of approach (AoA), compared respectively with the WWII-era Model MB Jeeps 45-degree AoA.
Ground Clearance: The M38 Model MCs Ground Clearance is 9.25-inches, compared to the 8.75-inches in the Model MB a half-inch probably sounds small to modelers in 1:35th scale, so the modeler will have to decide if this difference is worth the effort to mimic.
Overall Length: The M38 Model MC Jeep is 133-inches long with the spare tire fitted. The Willys Model MB Jeep is 132.25-inches in comparison. The modeler will have to adjust the Bumper/Bumperette seating a little bit to compensate for the .75-inch difference here. This isnt difficult to accomplish.
Inner Wheel Track: Model MB Jeep is 42.5-inches, as opposed to 41 3/8-inches in the M38 Model MC Jeep. The difference is mostly due to the wider tires fitted to the M38 Jeep.
Tread Center-to-Tread Center: The Model MB Jeep is 49-inches, as compared to 49 3/16-inches in the M38 Model MC again difference is mostly due to wider tire width on the M38.
Outer Wheel Track: Model MB Jeep equals 55.5-inches, compared to 57-inches in Model MC same as above for the difference.
Note: An even more esoteric difference between the two trucks; the wheels on the Model MB Jeep track inside each other, with a 49-inch span (Tread Center to Center). However, the Front Wheel track, center-to-center, on the M38 Model MC Jeep comes in at 49 1/8-inches and 49 3/16-inches at the rear; cutting a slightly wider track at departure. Though this difference is really small in scale, Im not sure anyone would appreciate the modelers effort for adjusting their miniatures stance to mimic this feature but Id do it just for the sheer fun of it in building this truck seriously.
The Bumper Mounts themselves are different on the M38 Jeep the gussets (small triangular braces) found on the WWII Model MB are not present in this variant, having been replaced with stamped versions. The Front Bumper/Rear Bumperette combination is similar between both vehicles. The M38 Jeeps Front Bumper is 46-inches wide, with 45-degree back-cuts on the ends.
Engine Enterprising modelers might want to add an Engine to their M38 Jeeps, since Tamiya gives you some good parts in the kit to begin with. The Engines are similar, with some parts different in the M38 as compared to the Model MB, but a credible effort can be done with available kit parts.
The Model MC Jeep had a factory-installed, fully waterproofed ignition system and could be fitted with a Deep Water Fording Kit. This combination of factory-installed and additional user-installed DWF Kit allowed the M38 Jeep to drive through water up to 74-inches deep which is over the top of the trucks windshield. The Willys Model MB could not perform in this manner from the factory.
Speaking of performance, neither Jeep Models were particularly fast likely 55-mph maximum safe on improved roads.
Body Tub The Body Tubs are similar in overall appearance as stated above, but the Pioneer Tools stow on the opposite side on the M38 Jeep. There is no Fuel Tank well on the M38 Jeep, and the front floor reinforcing channels are simpler as result. Instead of having to prop-up the Drivers Seat to refuel the Model MB WWII Jeep, the M38 has Fuel Filler protruding through the left panel. With the larger Body, the driver has a little more room to position the seat back from the Steering Wheel, increasing comfort for larger soldiers.
The M38 Jeeps Body Tub floor does not have a protruding riser panel for a Machine Gun mounting as found on the WWII Jeep as there was no MG Mount present on the truck as delivered from the factory. When the operators of the M38 Jeep in the field equipped their truck with a Machine Gun, it was fitted with a slightly different tripod-style mount (Mount M31A1) than found on the Willys Model MB Jeep that also called for a center reinforcement plate to be set underneath the Tub floor between it and the Frame.
There are no toolboxes mounted inside the rear wheel wells of the M38 Jeeps like found on the WWII Model MB Jeep, but the M38 does have a large bin underneath the passenger seat for such storage.
The M38 Jeep has a Tailgate, where the Model MB does not. The Tailgate has reinforcements mounted on it to handle the extra weight of both the Jerry Can and Spare Tire. In US Air Force service, the spare tire was relocated to the right side of the truck, affording uninterrupted use of the Tailgate on their M38 Jeeps. I am aware that civilian versions of the CJ-3A have the manufacturers logo WILLYS stamped on both sides of the Hood but I have not seen this feature on the military M38 as delivered from the factory. Collectors and restorers look for this feature to help determine authenticity on their trucks.
Interestingly, the Gussets used as a support brace for the Cowl is missing from all 1:35 scale Jeeps and not provided here either in the Plus Model conversion. They are not difficult to render in styrene, and a small effort considering all the other work youll be putting into your accurate M38 Jeep miniature conversion.
Another interesting note from collectors and restorers of these Jeeps; the early M38s had five Data Plates that each individually screwed directly to the Dashboard. After 9/1951 and Serial Number MC34151, they were mounted on a separate plate that was then screwed to the Dashboard. As delivered by another company, the Instrument Panel (complete with Gauges) came pre-painted. However, the Olive Drab color the supplier used didnt match the Willys Body Tub and Chassis/Frame color. And you think scale model builders have problems this color difference could be a fun feature for you to model in your own conversion effort and be accurate to the real vehicles.
The Seats in Tamiyas Model MB kit are similar enough to use without much consternation. The Steering Wheel on the M38 Jeep is OD Green, not Black, if you were wondering. The Rear Bench Seat is usable too. M38 Jeeps came with full canvas tops and side-curtains, and folding canvas doors. If you ever come across a photo or a restored M38 Jeep, and notice a length of chain welded to the Body Tub near the Steering Wheel this is an old military solution to preventing the Jeep from being easily stolen. The chain is wrapped around one of the spokes on the Steering Wheel, and then padlocked.
The Windshield Frame on the M38 Jeep is taller than found on the WWII era Model MB. This feature is intended to give taller drivers ability to see out of the windscreen without having to crank their necks downward. The M38 Jeep came with 4-inch thick seat cushions, as compared to the 2-inch thick cushions in the WWII Jeeps important for driver comfort. However, the extra comfort afforded by the thicker seat cushions negated the benefit of the added height of the Windshield Frame for taller M38 Jeep drivers.
The M38 Jeeps have vacuum-operated Windshield Wipers, where the WWII Jeeps are equipped with linked manually operated Wipers. The Windshield Wipers on the M38 are mounted on the bottom of the windshield glass. When the Arctic Kit is installed, the Wipers are mounted to the top of the Windshield Frame, and there is a long duct placed in the motors former position intended to blow air across the bottom of the glass for defrosting.
The M38 Jeeps Hood has wooden riser blocks for bracing the Windshield Frame when folded down forward.
Another easily seen feature difference is the prominent Grill. The Willys Model MB has a 9-slot Grill. So do the six prototype M38 Jeeps, known as Model MC-38 Jeeps. The standardized Model MC Jeeps have 7-slot Grills, with hinges on the bottom that allow the Grill to be folded down forward for pulling out the Engine in one piece to service or replace.
The Headlights on the M38 Jeep are larger than their WWII cousins, and protrude from the Grill, where the Model MBs are recessed behind the Grill. The Headlights on the M38 had Guards mounted diagonally in front of the lens, almost giving the M38 a slant-eyed look from certain angles.
What You Get in Plus Models Conversion
With Conversion parts safely bagged in bubble-wrap, the Plus Model M38 Jeep set comes in a sturdy little cardboard box, with a color photo of a completed miniature on the front. Not to be nit-picky, the box is large enough to have accommodated a resin Body Tub too.
Photoetch: The box photo states that a photoetched fret is included with the Plus Model set but none of the three conversions that I purchased had any such item in them, and the Instruction Sheet does not refer to photoetched parts, as near as I can figure. I cant explain what the discrepancy means.
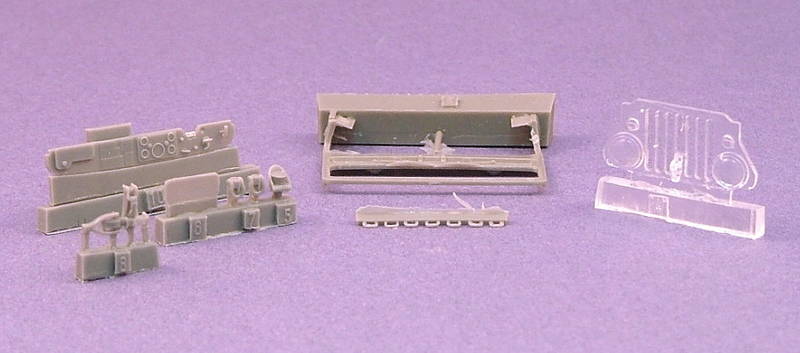
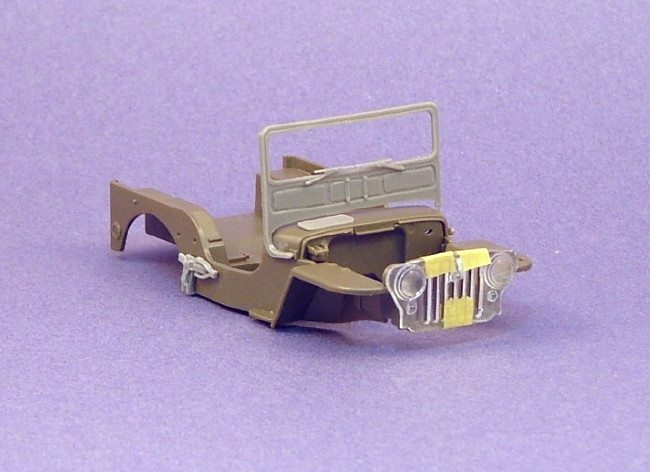
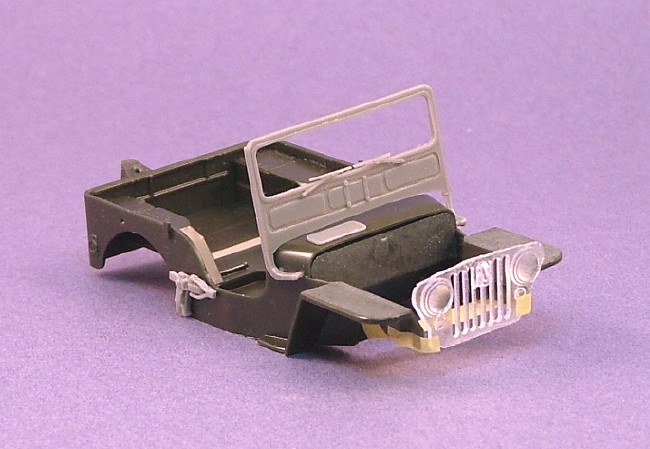
Resin: Nineteen grey resin parts, one of which (Grill) is cast clear, make up the major parts of the conversion. All the parts are generally soapy in appearance, brittle and soft on detail. The Windshield Frame is easily damaged if you arent careful in removing it from the pour gates I broke and had to repair the fragile Windshield Pivot Arm in the process. It does not fit well to the cowls of either suggested donor kit - shown in photos at right. Likewise for the clear resin Grill though I like the feature of casting it clear so that all you have to do is back-paint the Headlight Lenses and then mask the front for painting, and you can trim it to fit properly. The Tamiya kit calls for you to cut away their Grill, and on the Italeri kit, you can just interchange it with their plastic part.
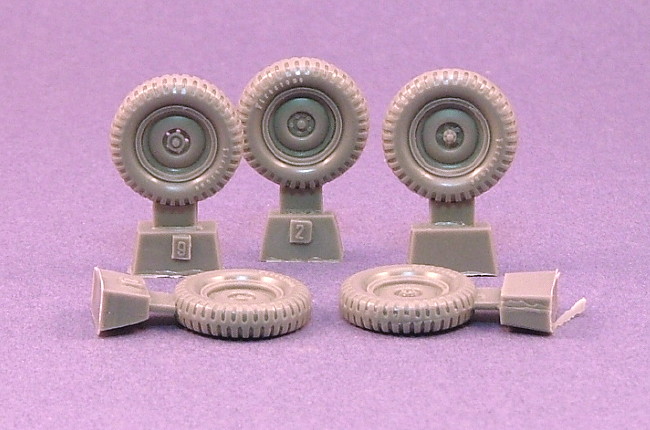
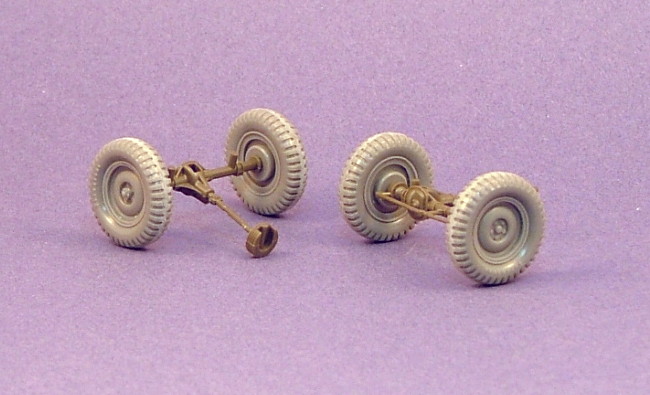
Three of the five Wheels I got in each example were cast slightly out of round (like mold slip). Some careful cleanup of the center seam down the middle of the tread remedied the problem and didnt take them out of round dramatically. At right, I have a photo of the Plus Model wheels on Tamiya axles. They fit fine. I didn't include a photo of them on corresponding Italeri axles - because they won't fit unless you put collars on the axle stubs.
Plus Models gives you a set of tie-downs that go around the rear of the miniature Jeep, the Fuel Filler, Front Clevices, a plain rectangle that you might mistakenly discard for the Battery Box Cover and the Shovel/Axe Head Stowage to which you add your own handle stock.
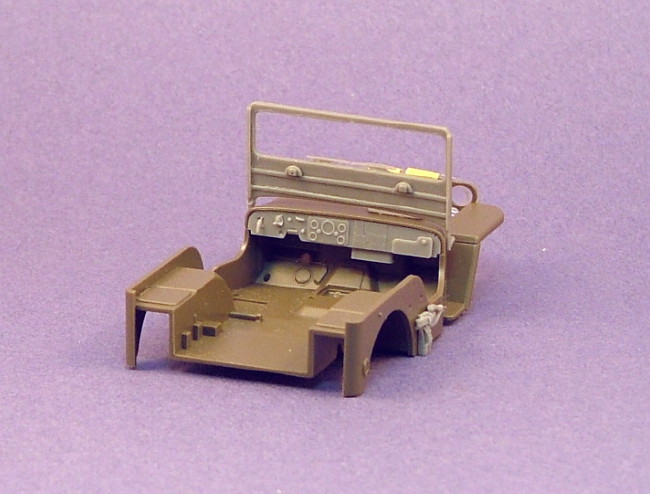
The Dashboard has good detail present, including the five Data Plates that should be present. The modeler can simply scribe a couple of lines to mimic a later M38 Jeeps fitting or leave the detail as is for an early truck. Note, in the photo with Tamiya's Body Tub, you get a decent Dashboard fit with no trimming. In the fit on the Italeri kit, you'll have to perform a bit more work on the Plus Model part to fit in in the cowl. None of the parts in the sets I purchased were warped. Small amounts of flashing proved easy to trim away with a sharp X-Acto Blade.
I use items from Tiger Model Designs as my standard for comparing resin casting detail and quality. If I set TMD at a 10-rating, the Plus Model M38 Jeep Conversion parts, overall, come in at a 7-rating.
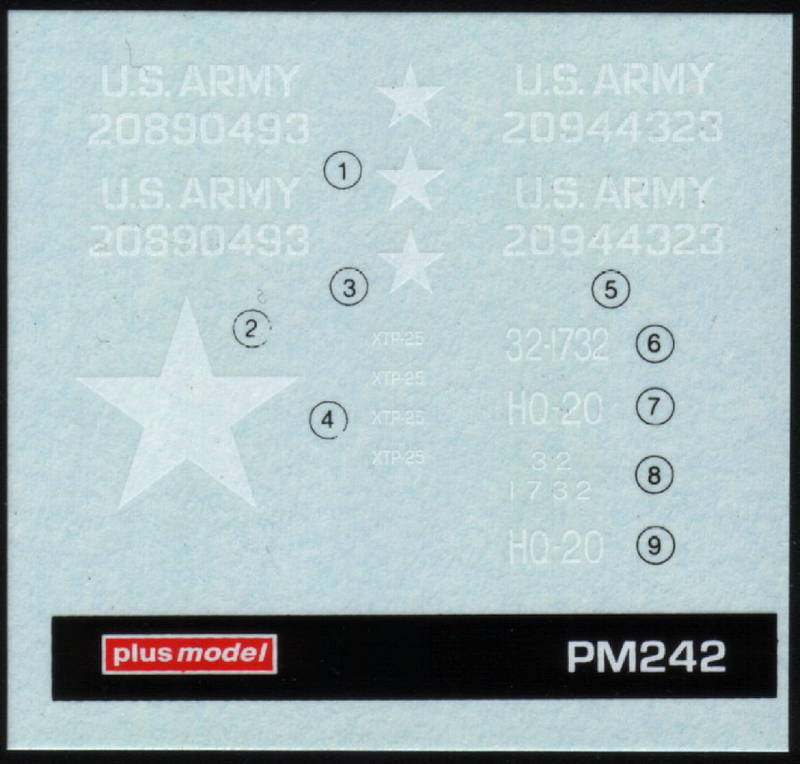
Decals/Clear Sheet: A small sheet with markings for a M38 Jeep is included. They are clear and well-printed. The decal film is thin and I dont anticipate difficulties in using them. The provided markings are for US ARMY 20890493 and US ARMY 20944323 which do fall into the proper registration range for the M38 Jeeps.
Historically speaking, seven-digit Hood Registration Numbers ran from 236xxxx through 238xxxx from 9/1950 to 5/1951. After 5/1951, M38 Jeep Registration Numbers were eight-digits long, running from 208xxxxx through 209xxxxx. For the time period, M38 Jeep numbers and lettering appear to be mostly, and neatly, handpainted stencils not used in most cases, or the stencils were used and the lettering/numbers filled in neatly.
The clear sheet provided by Plus Model is meant for the modeler to trim out the one-piece windshield glass insert. A die-cut would have been most appreciated here.
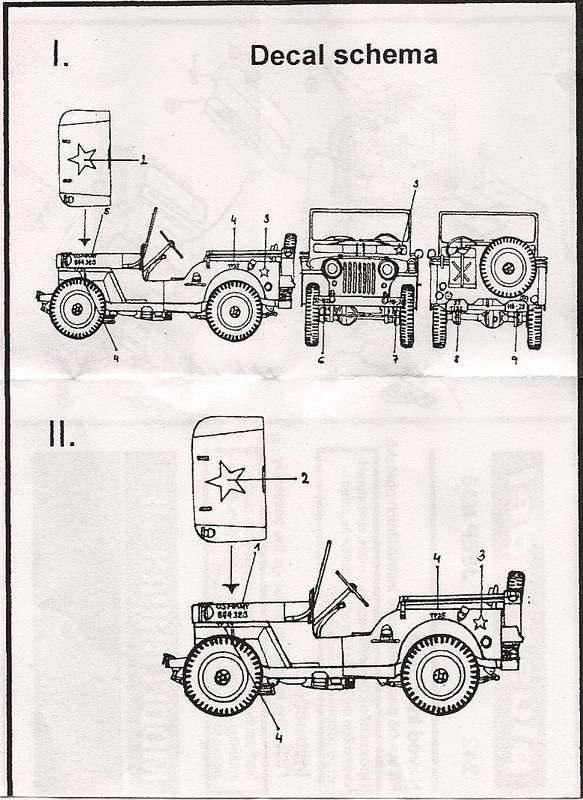
Instruction Sheet: On a very small sheet of paper, Plus Models gives the modeler two view drawings of the M38 Jeep calling out assembly instructions roughly with very small numbers. If I didnt know the subject well, Id have found the instructions of little value. Still, I had to look a couple of times and I found putting on my Optivisor helpful in seeing what information is conveyed therein. No joke the print is tiny. The Instruction Sheet, does however, fit the small packing box and this might have been the overriding goal in making it so small.
Conclusion
Though this reads as a critical review of the Plus Model M38 Jeep Conversion, I bought three of them for this article to be fair in my overall assessment of the product. I do intend to use them might even buy a couple more after writing this, but admit disappointment in the shortcomings of the conversion that comes out in my review. Jeeps are fascinating small utility trucks, and I was very excited to purchase what initially appeared to be a complete conversion. Some restorers and collectors consider the M38 Jeep the best of all flat-fendered Jeeps. Its historically significant, and though the WWII variant dwarfs its production numbers, the M38 deserves decent representation in miniature. I do not feel this conversion does the actual vehicle enough justice, and I cannot recommend it to anyone other than the rabid Jeep fan or modelers with a depth of reference material, skill and desire to pull it together.
Setting the shortcomings of historical accuracy and completeness aside, the Plus Model conversion falls a bit short in crisp detailing as compared to the earlier RC Berg M38 Conversion. It is a step backwards. To be fair, I cited that both conversion sets fall short of total accuracy in rendering the M38 Model MC Jeep, but offer that either can be built up into decent replicas for modelers not desiring this kind of exacting detail.
SUMMARY
Highs: Nicely done Dashboard and Decal Sheet.Lows: Sharper detail and providing a Body Tub would have made this a great conversion idea.Verdict: Does not do the M38 Model MC Jeep justice, this is little more than a cosmetic makeover of available WWII-era Willys Jeep kits.
About Jim Lewis (GunTruck) FROM: CALIFORNIA, UNITED STATES
I love American AFV's from all eras and researching Vietnam-era Gun Trucks and US Army Pentomic and Atomic Battlefield Ordnance from the 1950's through the 1960's. Avid Sci-Fi fan and modeler as well - Star Wars, Space:1999, and Star Trek are favorites. Owner/Master Miniaturist - GunTruck Studios....
i built my M38 MC model up from a conversion which was manufactured by a japanese company "TC Berg" ...
the kit is no longer available since more than 10 years but think gives the characteristica of the M38 better than the plusmodel kit
also they produced a M38A1 conversion
If you read the review, thats what Jim says too.
Great review Jim. Too bad they missed the mark on it. It should still look pretty good once done though.
Jimn,
Excellent and very comprehensive review. Thanks.
I know you mentioned the tool placement. It goes without saying that the notches on the left side of the tub need to be filled, and then added to the right side .
Even the Rat Patrol folks used M38's, and most folks never knew the difference...
Is there a prefered kit to use for this conversion?
Tamiya or Italieri?
What about the functional spring sets and steerable front axle.
Have they been reviewed as well?
It doesn't matter which kit you use, it still will not be an accurate M38. The M38 was bigger and had a taller stance than the Willys MB. Converting an MB is not going to get you an M38, just an inaccurate vehicle that is a Willys MB with M38 parts.
The best bet is to use the new MMK M606 kit and parts from the Plus Model M38 Conversion set. The M38 has the same body as the M606, which has the higher hood to accommodate the taller Hurricane engine. You would meed to use the Plus Model M38 conversion set grill and dash board with either the MMK hood cut down or a Williys MB hood. You also have to cut down the engine cowl between the dash and hood. This will give you an accurate M38. It is also what I plan to do.
If you don't want to do all that, the Tamiya MB is the most accurate and easiest to build. Like I said and mentioned in the review, it won't really be an M38.
Center left - Willys Model Jeep WWII-era. On center right, the M38 Jeep. It is easier to see the difference in size between all four of these Jeep models.
Conversion Parts as provided.
Plus Model's wheels press-fit onto Tamiya's axle parts without fuss. No corresponding photo here of them on Italeri axles, as they do not fit without a collar fitted on the axle stubs.
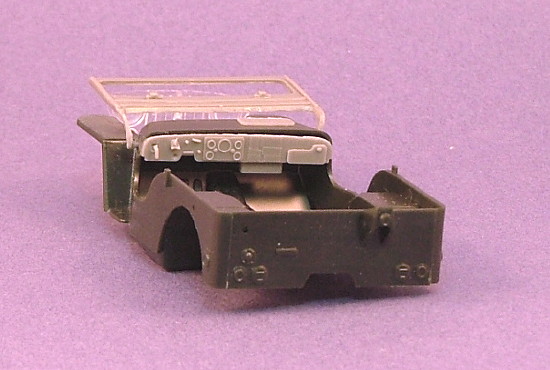
Tamiya Body Tub with Plus Model parts in place. Grill is taped to Tamiya cast-in Grill. Note the poor fit of the Windshield Frame.
Plus Model's Dashboard slips neatly inside of Tamiya's Cowl.
The Plus Model Grill takes the place of Italeri's separate part, with just a little shaping called for to fit the Hood properly. Note, the Windshield Frame fit to the Italeri kit is no better than on the Tamiya kit.
Plus Model's Dashboard part is a little bigger than the cowl opening on the Italeri kit. A little trimming and shaping call for in use here. Folded down forward, the Windshield Frame still doesn't look good, and will call for some reworking.


Comments